My Workstations
Overview
My Workstations provides researchers with secure, cloud-based virtual machines for performing data analysis directly within Quark V3. Each workstation is a fully provisioned environment built from a pre-configured image — with tools such as JupyterLab, RStudio, VSCode, or specialist software like AlphaFold2 and Schrödinger Suite already installed.
Every workstation request must be approved by your DS Administrator before the instance can be launched. Once approved and running, the workstation is accessible from your browser, with all data flows subject to platform governance and audit logging.
Navigation: Select My Workstations from the left-hand navigation pane.
The Workstations Page
The My Workstations screen lists all workstations you have requested or are currently using.
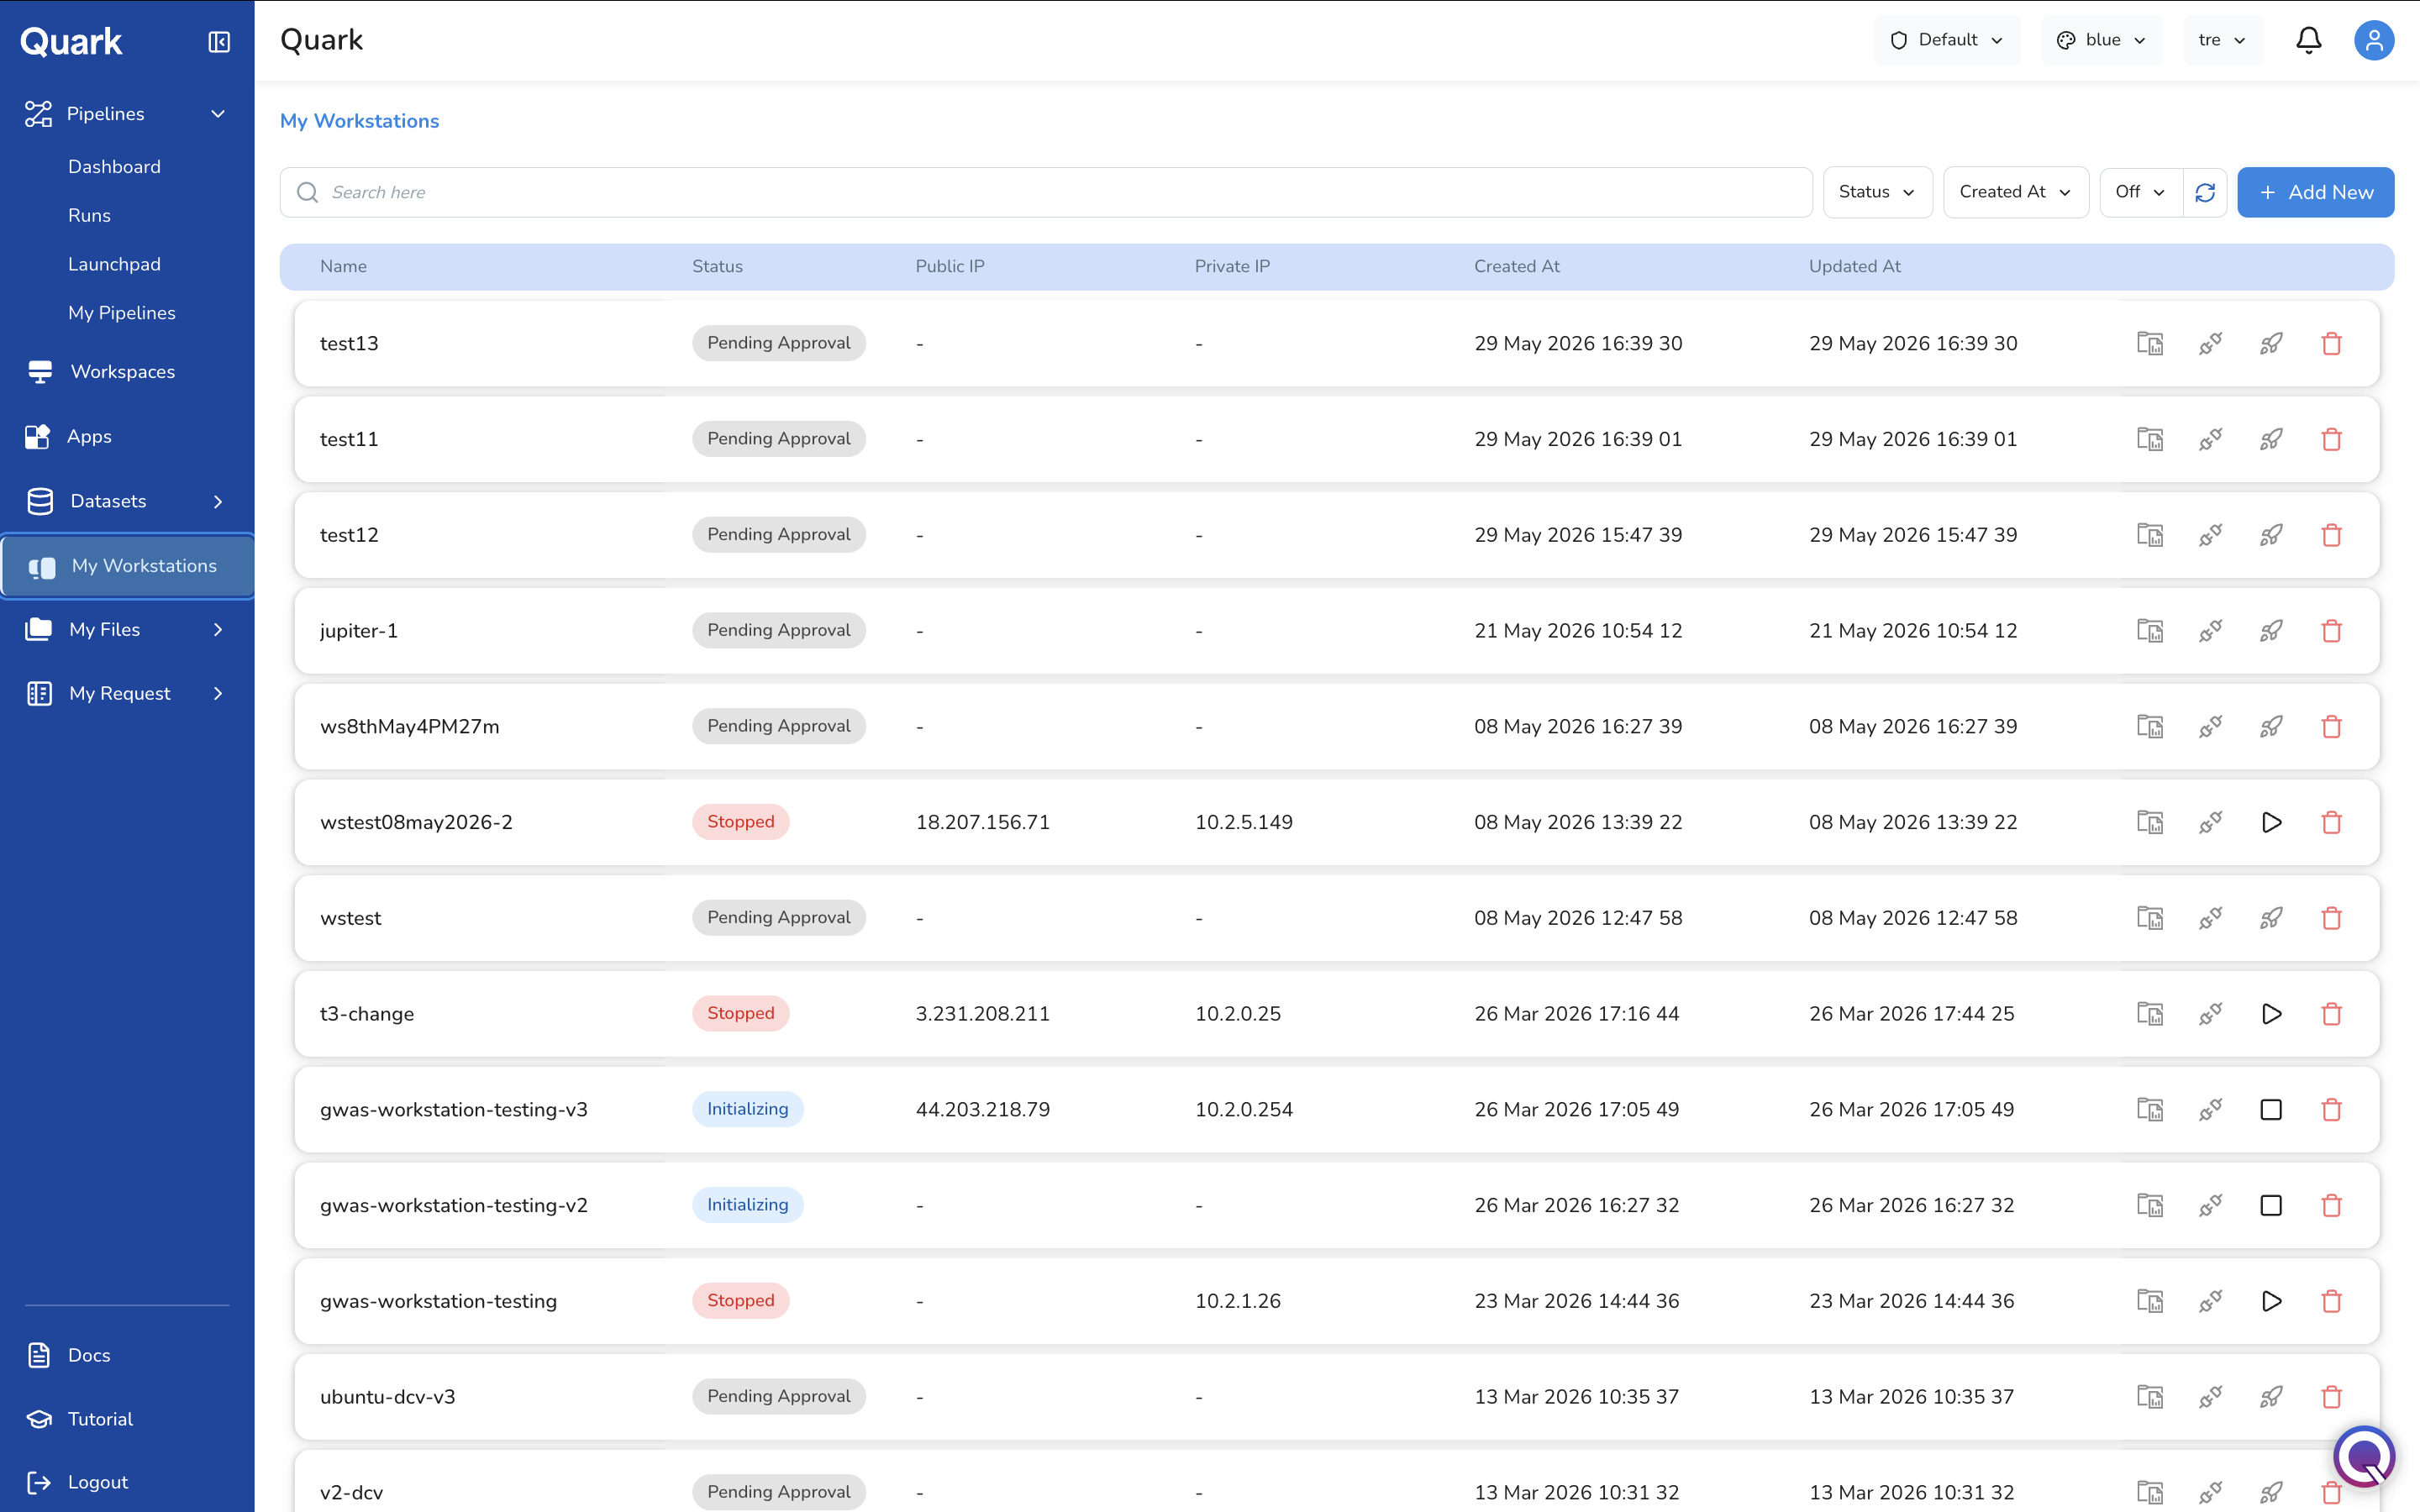
Each row shows:
| Column | Description |
|---|---|
| Name | The workstation's name as set at creation. |
| Status | The current state of the workstation (see Workstation Statuses below). |
| Public IP | The public IP address of the workstation, once provisioned. Displays - until the workstation is running. |
| Private IP | The private IP address within the platform's network. Displays - until provisioned. |
| Created At | When the workstation was created. |
| Updated At | When the workstation's status was last updated. |
Use the search bar to find a workstation by name. Use the Status and Created At filters to narrow the list.
Row Actions
The action icons available on each row change depending on the workstation's current status:
| Icon | Action | Available When |
|---|---|---|
| Connect | Open the workstation in your browser. | Running |
| Copy SSH address | Copy the workstation's SSH connection string to the clipboard. | Any status |
| Launch (rocket) | Submit the workstation for provisioning after approval. | Approved |
| Start (▷) | Start a stopped workstation. | Stopped |
| Stop (□) | Stop an initialising or running workstation. | Initializing, Running |
| Delete | Permanently delete the workstation. | Any status |
Workstation Statuses
| Status | Description |
|---|---|
| Pending Approval | The workstation request has been submitted and is awaiting review by your DS Administrator. |
| Approved | The request has been approved. Click the Launch icon to begin provisioning. |
| Initializing | The workstation is being provisioned. Wait for the status to update to Running before connecting. |
| Running | The workstation is active and ready to connect to. |
| Stopped | The workstation has been stopped. Click Start to resume. |
Requesting a Workstation
To request a new workstation:
- Click + Add New in the top-right corner of the My Workstations screen.
- The Create Workstation — Select Image screen opens, displaying the gallery of available workstation images.
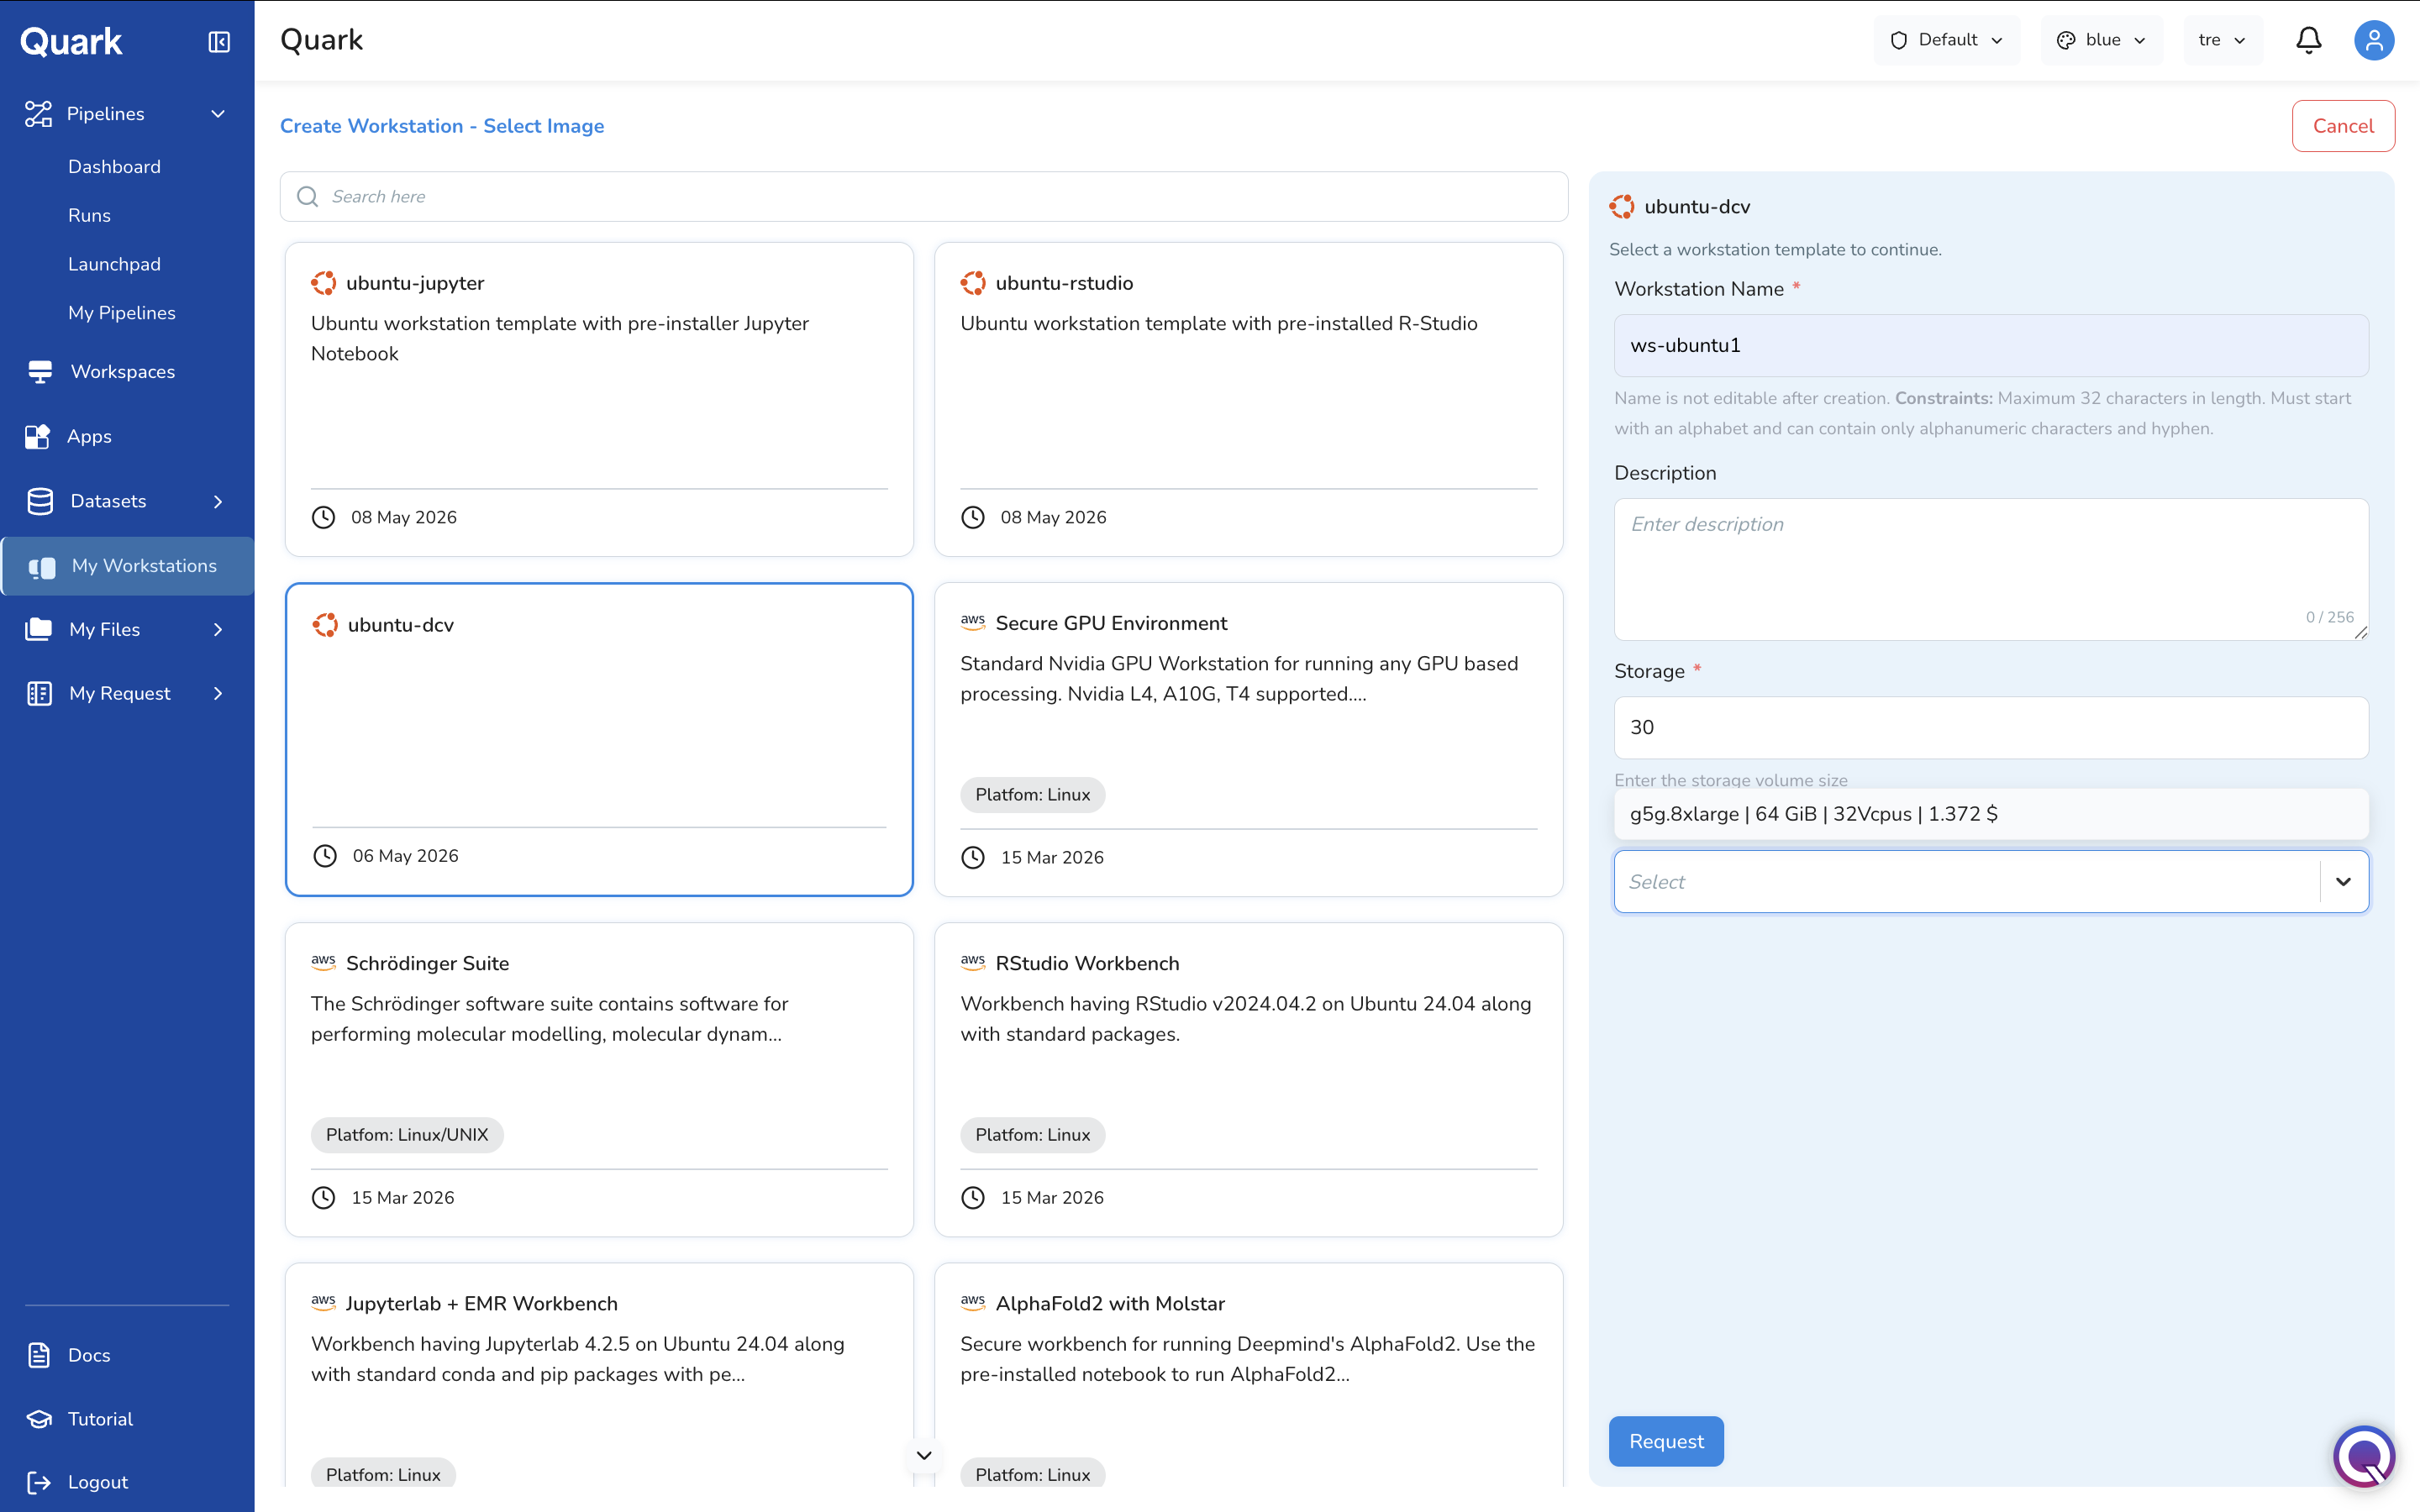
Selecting an Image
Browse the image gallery and click on the template that best suits your analytical requirements. Available images include:
| Image | Description |
|---|---|
| ubuntu-jupyter | Ubuntu workstation with pre-installed JupyterLab. |
| ubuntu-rstudio | Ubuntu workstation with pre-installed R-Studio. |
| ubuntu-dcv | Secure Ubuntu desktop accessible via browser. |
| Secure GPU Environment | Nvidia GPU workstation supporting L4, A10G, and T4 GPUs. Platform: Linux. |
| Schrödinger Suite | Molecular modelling and dynamics software suite. Platform: Linux/UNIX. |
| RStudio Workbench | RStudio v2024.04.2 on Ubuntu 24.04 with standard packages. Platform: Linux. |
| Jupyterlab + EMR Workbench | JupyterLab 4.2.5 on Ubuntu 24.04 with conda and pip packages. Platform: Linux. |
| AlphaFold2 with Molstar | Pre-configured environment for running AlphaFold2 with Molstar visualisation. Platform: Linux. |
Use the search bar above the gallery to filter images by name.
Configuring the Workstation
When you select an image, a configuration panel appears on the right side of the screen. Fill in the following fields:
| Field | Description | Constraints |
|---|---|---|
| Workstation Name * | A unique name for your workstation. | Maximum 32 characters. Must start with a letter. Alphanumeric characters and hyphens only. Not editable after creation. |
| Description | A brief description of the workstation's intended purpose. | Maximum 256 characters. |
| Storage * | The disk storage size in GB. Defaults to 30. |
Numeric value. |
| Capacity * | The compute capacity (instance type, memory, vCPUs, and hourly cost). Select from the available options in the dropdown (e.g., g5g.8xlarge | 64 GiB | 32Vcpus | 1.372 $). |
Once all fields are complete, click Request.
The workstation will appear in the My Workstations list with a status of Pending Approval.
Note: Notify your DS Administrator if your request requires expedited review.
Launching a Workstation
Once your DS Administrator approves the request:
- Confirm the workstation status has updated to Approved.
- Click the Launch icon (rocket) in the workstation's row.
- The status will update to Initializing while the instance is being provisioned.
- Once the status updates to Running, the workstation is ready to use.
Connecting to a Workstation
Once the workstation is Running:
- Click on the workstation name to open its detail view.
-
On the Summary tab, locate the Network & Security section.
-
Copy the Password using the copy icon next to the masked value.
- Return to the workstations list and click the Connect icon on the workstation row.
- Enter the username —
ubuntufor Linux workstations — and paste the copied password. - Click Sign in. If prompted again, re-enter the password to complete the connection.
You will see the workstation's desktop environment open in your browser.
Alternatively, use the Copy SSH address icon from the workstation list to connect via SSH from your local terminal.
Managing a Workstation
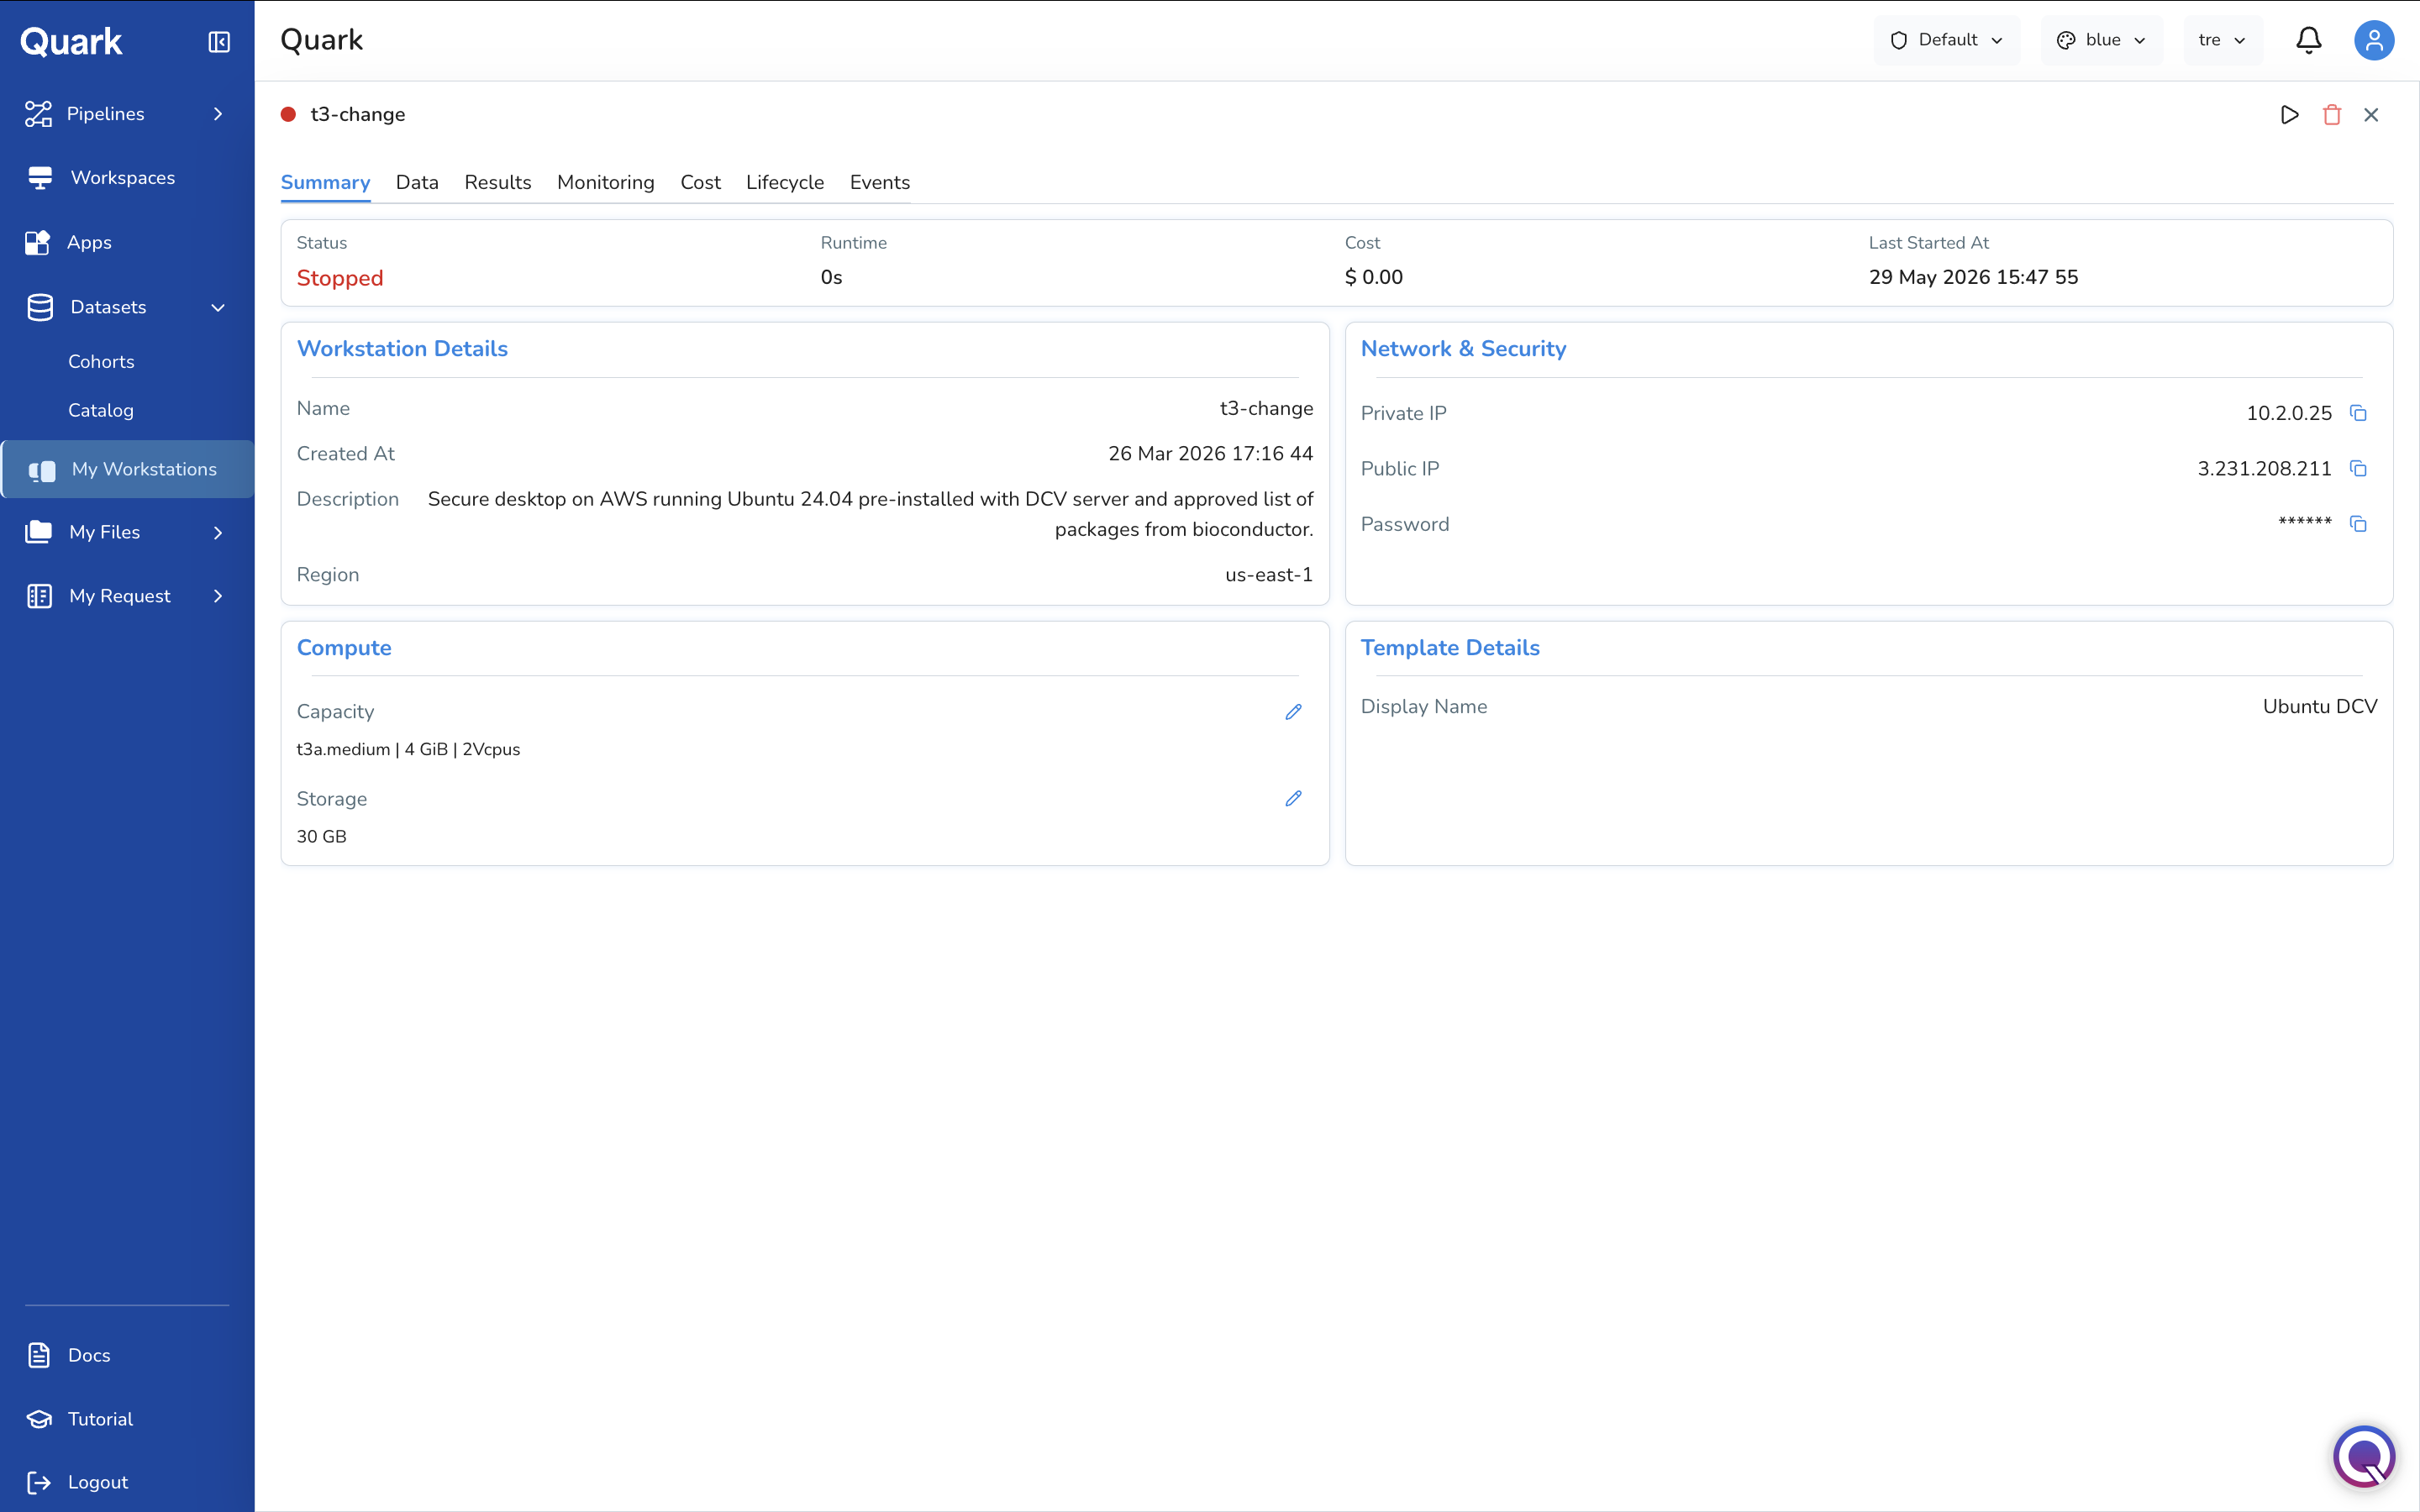
Clicking on a workstation name opens its full detail view, organised across seven tabs.
Summary Tab
The Summary tab provides a snapshot of the workstation's current state and configuration:
| Section | Fields |
|---|---|
| Header | Status, Runtime, Cost (current session), Last Started At. |
| Workstation Details | Name, Created At, Description, Region. |
| Compute | Capacity (instance type, memory, vCPUs) and Storage, each with an edit (pencil) icon to change the value. |
| Network & Security | Private IP, Public IP, and Password — each with a copy icon. |
| Template Details | The display name of the image the workstation was built from. |
Changing the Instance Type or Storage
To adjust compute resources after creation:
- On the Summary tab, click the edit icon (pencil) next to Capacity or Storage.
- Select a new instance type from the available options, or enter a new storage value.
Note: Changing capacity or storage may require the workstation to restart.
Data Tab
The Data tab displays files that have been uploaded to the workstation and are available for use in your analysis.
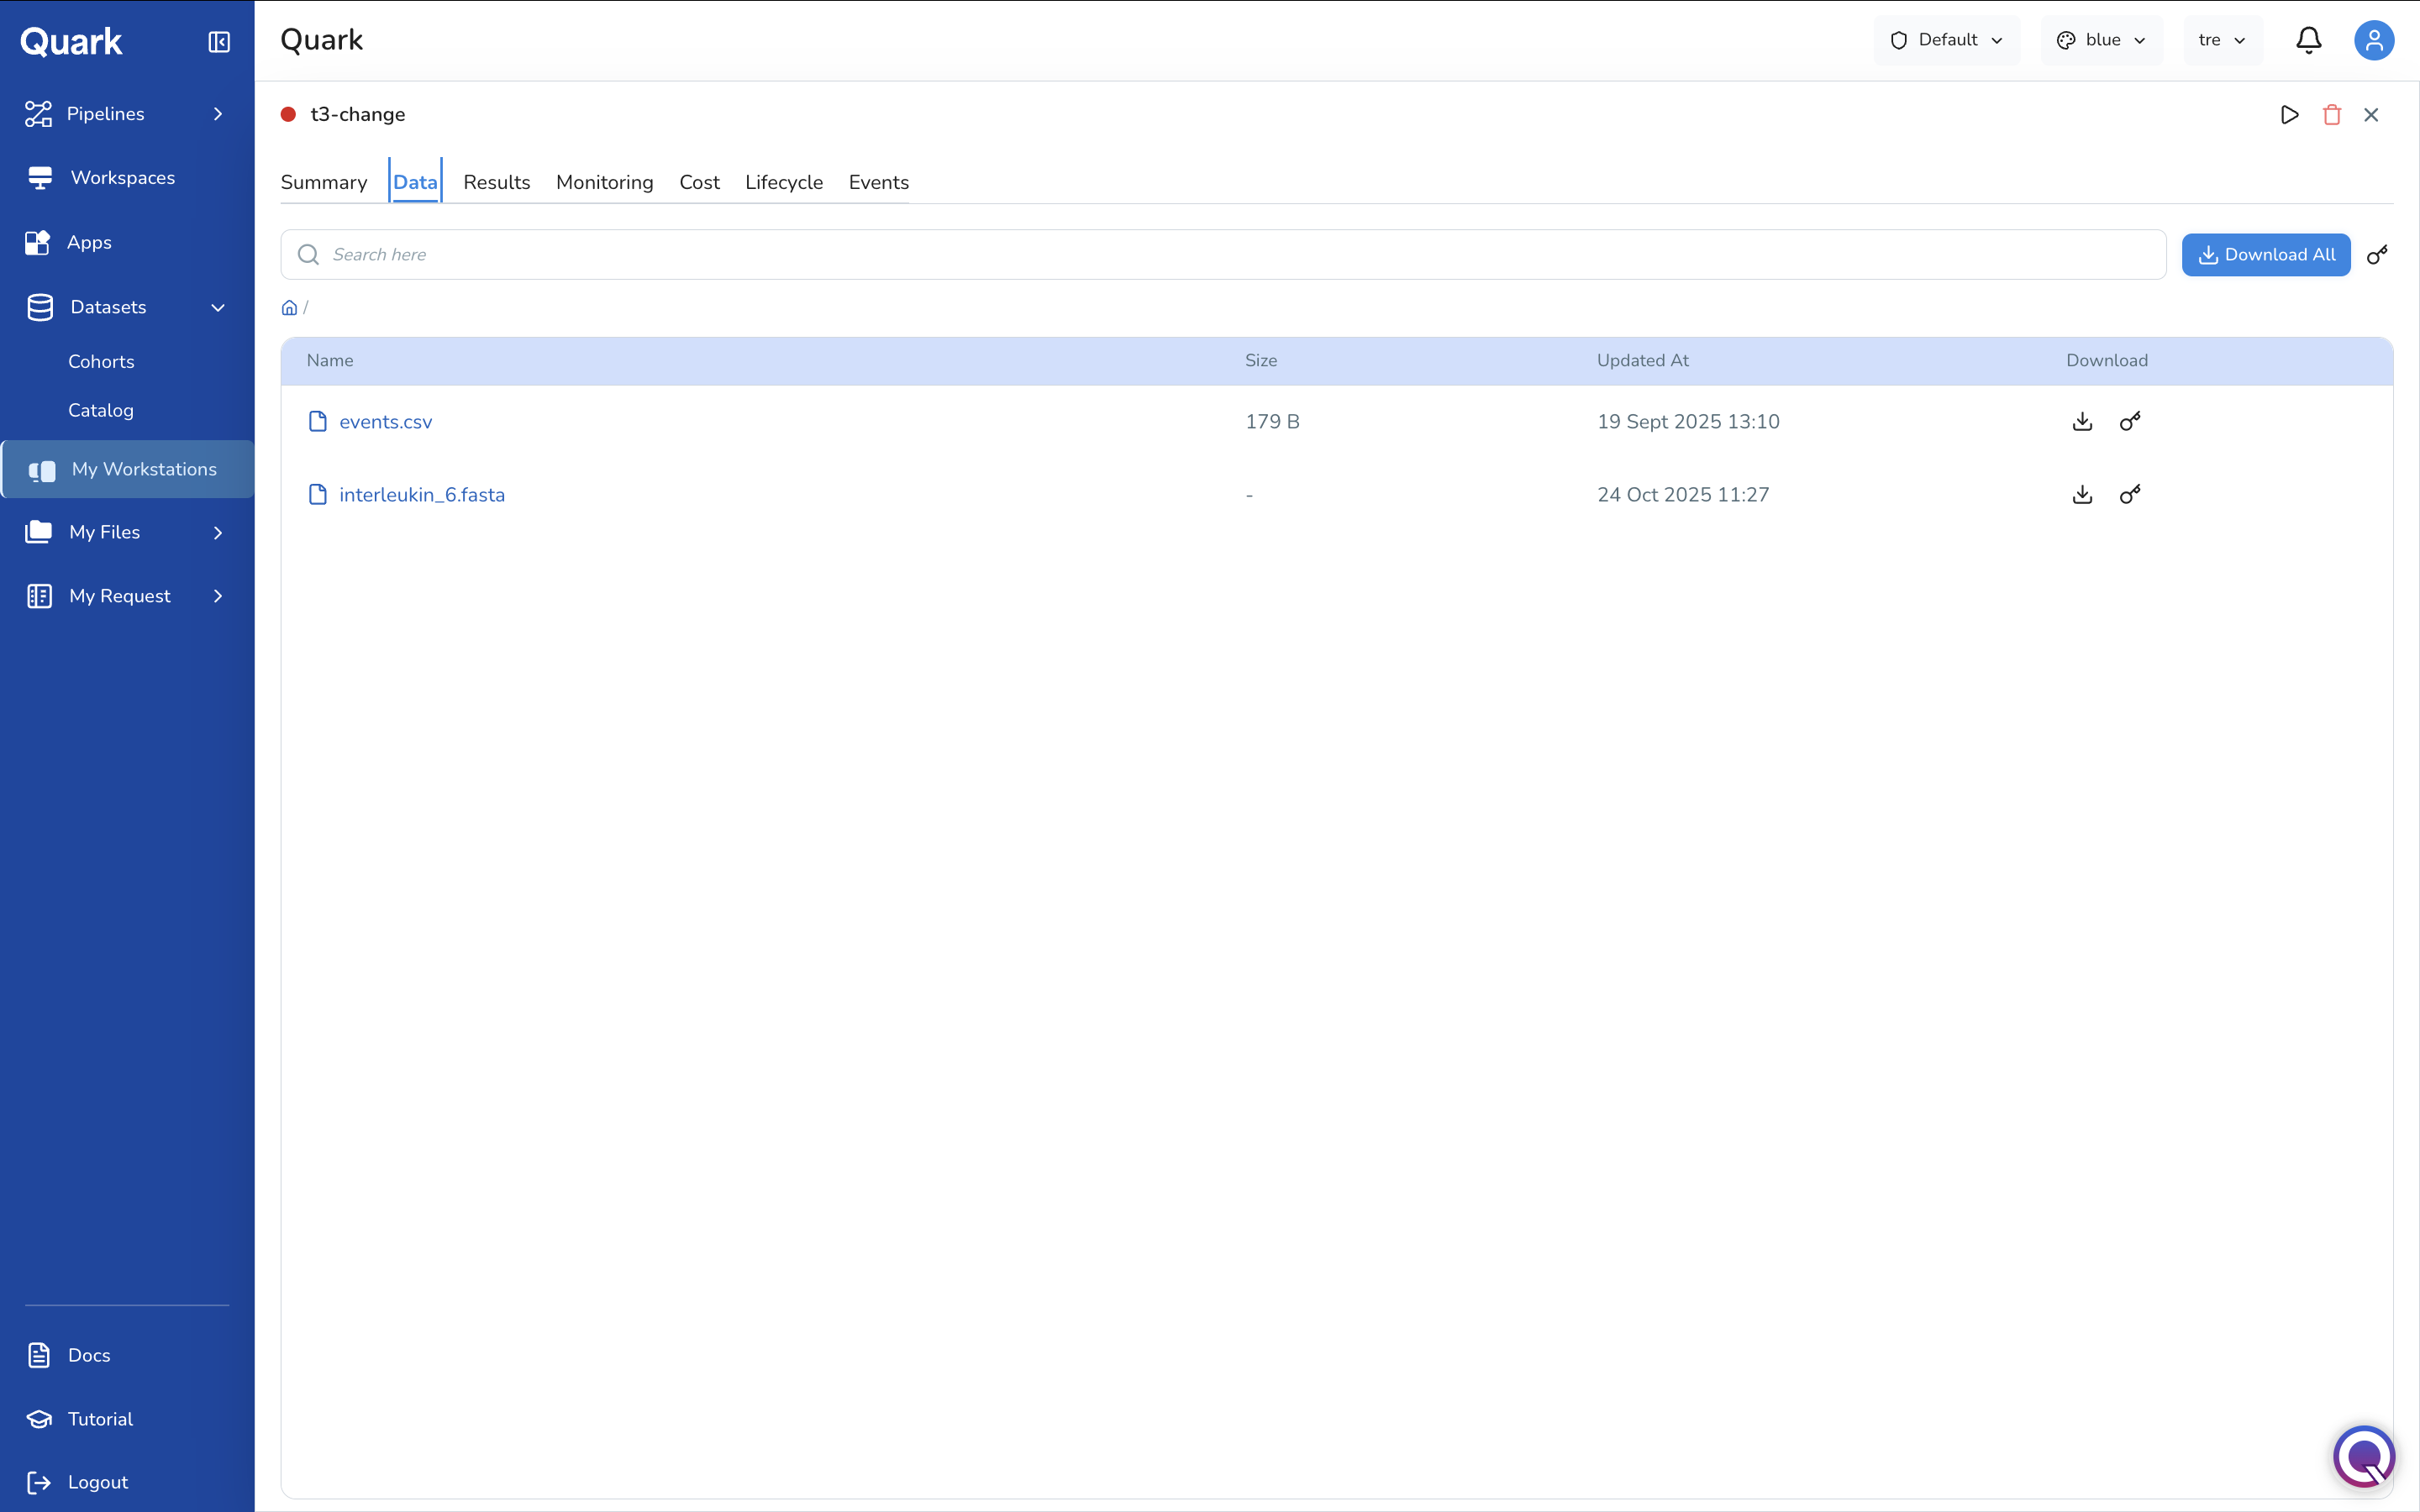
Each file row shows its name, size, last updated date, and two action icons:
- Download — Download the file to your local machine.
- Copy link — Copy a direct link to the file for use in scripts or notebooks running on the workstation.
Use Download All to retrieve all files in the current directory at once. Use the search bar to find a specific file by name.
Uploading Files to a Workstation
To upload a file from your local machine to the workstation:
- Navigate to the Data tab.
- Click the Action icon (top-right of the file listing).
- Select Upload Data and choose the file to upload.
Uploaded files undergo a security scan before transfer. The approval workflow proceeds as follows:
| Status | Description |
|---|---|
| Scanning | The file is being scanned for vulnerabilities. |
| Scan Success | The file has passed scanning and is awaiting admin approval. |
| Pending Approval | The file is awaiting review by your DS Administrator. |
| Uploading | The file is being transferred to the workstation. |
| Uploaded | The file is available on the workstation. |
Track upload status under My Request in the navigation menu.
Results Tab
The Results tab lists output files generated by your analysis within the workstation. Files appear here once they have been saved to the workstation's output directory.
Requesting a File Download
Output files cannot be downloaded directly — every download must be approved by your DS Administrator before the file can be retrieved.
To request a download:
- Navigate to the Results tab.
- Click the Download icon in the row of the file you want to download.
- A notification confirms the request has been submitted.
The file is not downloaded immediately. Track the request status under My Request:
| Status | Description |
|---|---|
| Pending Approval | The request is awaiting review by your DS Administrator. |
| Approved | The request has been approved. Click the Download icon again to retrieve the file. |
| Rejected | The request was declined. Contact your DS Administrator for clarification. |
| Downloading | The file transfer is in progress. |
| Downloaded | The file has been successfully downloaded. |
| Download Failed | The transfer encountered an error. |
Once approved, return to the Results tab and click the Download icon again to initiate the transfer.
Monitoring Tab
The Monitoring tab provides real-time performance metrics for the running workstation, including:
- CPU usage
- Memory consumption
- Disk space utilisation
Use these metrics to identify resource bottlenecks and determine whether the current instance type is appropriate for your workload.
Cost Tab
The Cost tab shows the cost breakdown for the workstation, with daily, weekly, and monthly views based on actual resource consumption. Use this to track spending against your project's budget allocation.
Lifecycle Tab
The Lifecycle tab enables you to define automated start and stop schedules — ensuring the workstation is not left running outside of active research hours.
To add a lifecycle policy:
- Navigate to the Lifecycle tab.
- Click Add New Policy.
- Define a schedule (e.g., start at 9:00 AM, stop at 6:00 PM on weekdays).
The workstation will automatically start and stop according to the defined schedule.
Events Tab
The Events tab provides an automatic log of all workstation activities — creation, launch, start, stop, and termination events — each with a timestamp and status update. Use this for troubleshooting and audit purposes.
Starting and Stopping a Workstation
Stop your workstation when it is not actively in use to avoid accruing unnecessary costs. Start it again when you are ready to resume work.
- Stop — Click the Stop icon from the workstation list or use the header controls in the detail view.
- Start — Click the Start (▷) icon from the workstation list.
Stopping a workstation preserves your data and configuration — it does not delete the instance.
What's Next
- Datasets — With an approved and running workstation, return to Datasets to query cohort data from within the workstation environment.
- My Request — Track the status of all your workstation requests, file uploads, and download requests.
- Pipelines — Use your workstation alongside pipeline runs to analyse results interactively.