Domains
Overview
The Domains section is where the Infrastructure Administrator registers and manages the custom domains and TLS certificate authorities that platform services are exposed through. Every workload endpoint, ingress route, and HTTPS service the platform serves depends on a domain configured here.
The Domains section is organised into two tabs: Domains and Certificate Issuers.
Navigation: Select Domains from the left-hand navigation pane. The section expands to show Domains and Certificate Issuers as sub-items.
Domains Tab
The Domains Page
The Domains tab lists all domains registered on the platform. Each row shows:
| Column | Description |
|---|---|
| Name | The unique identifier for this domain entry. |
| Status | Whether the domain is currently Available or in an error state. |
| Sync | The result of the last synchronisation with the DNS provider — Success or a failure state. |
| Tags | The registrar type (e.g., R53 for Route53, GoogleCloudDNS). |
| Type | Whether this was Imported from an existing DNS provider or Created as a new hosted zone. |
| Scheme | Whether the domain is Public (internet-facing) or Private (internal network only). |
| Subdomains | The number of subdomains currently registered under this domain. |
| Age | How long ago this domain entry was created. |
| Created By | The user who registered the domain. |
| Created At | The date and time the domain was registered. |
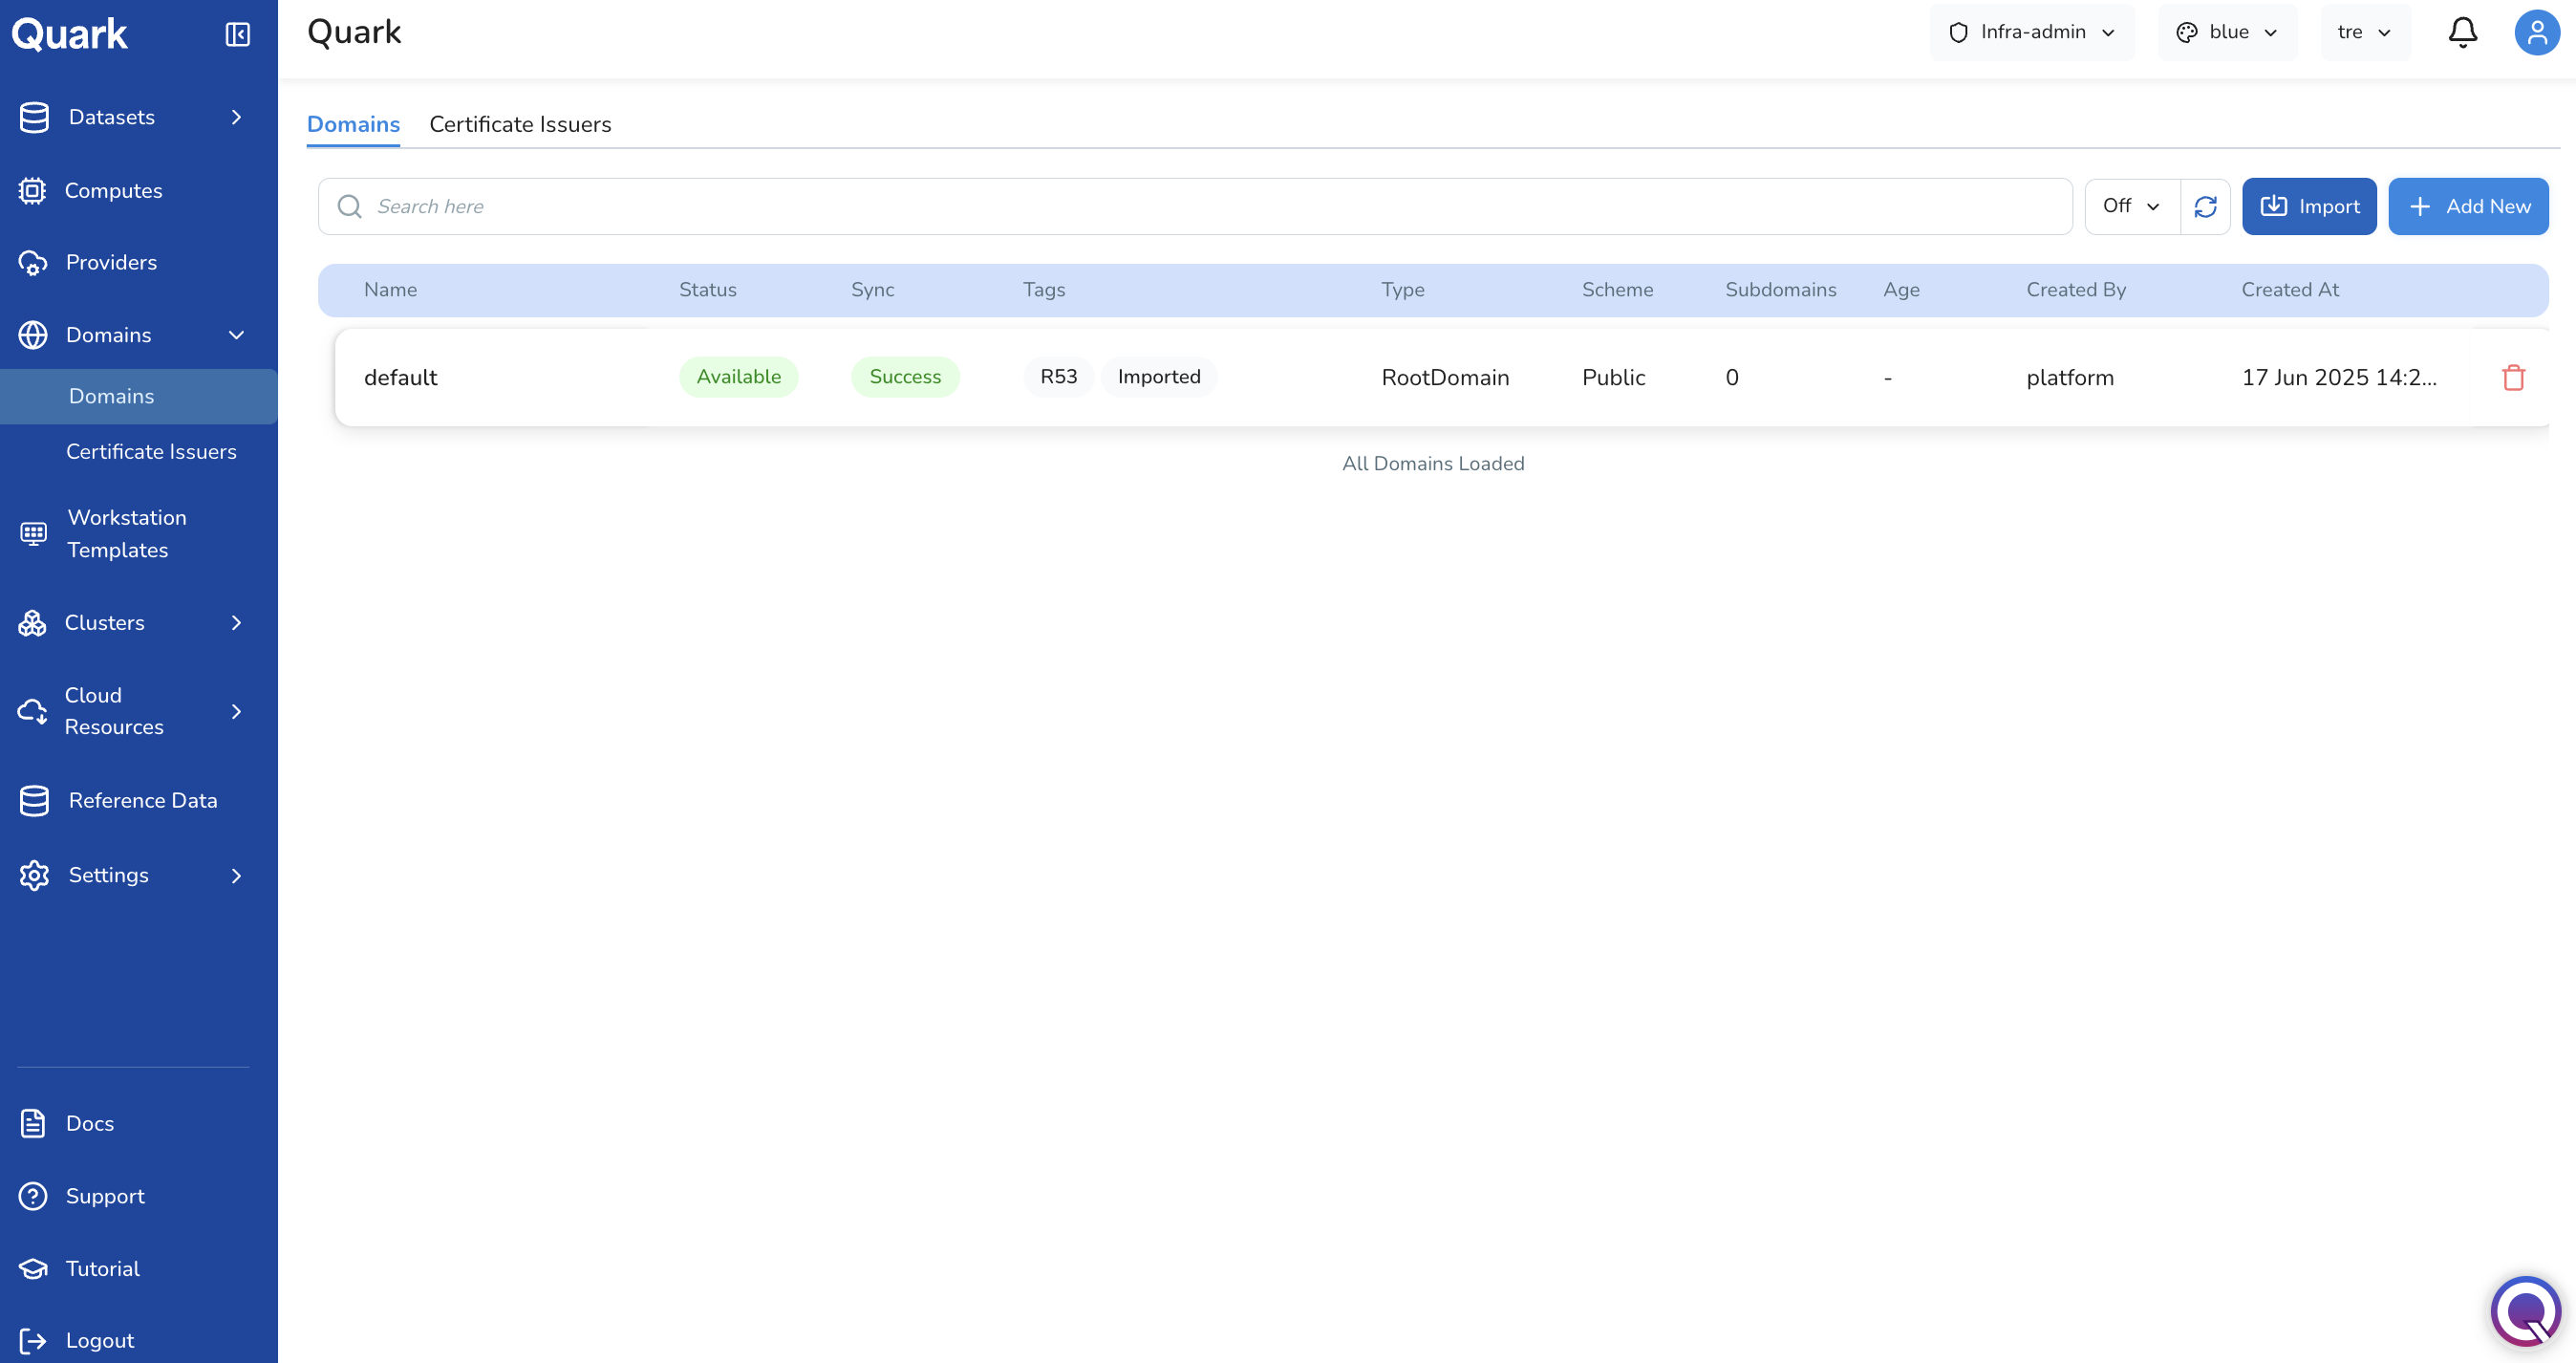
Domains created here can be used to configure Ingress endpoints for workloads running on the platform.
Import vs Add New
The Domains tab offers two ways to register a domain, accessed via separate buttons in the toolbar:
- Import — Brings in a domain that already exists and is managed in an external DNS provider (e.g., an existing Route53 hosted zone, a Google Cloud DNS zone, or an externally managed domain). Quark reads the domain's existing configuration and allows the platform to reference and manage DNS records within it.
- Add New — Creates a new hosted zone on the platform, backed by a supported DNS provider. Use this when defining a net-new domain or private hosted zone that the platform will own and manage from the start.
Both flows use the same three-step wizard — General → Spec → Review — but the Spec fields differ depending on the domain type selected.
Importing a Domain
- Click Import in the toolbar.
-
The Select Domain Type modal appears. Available types for import: Azure DNS, External Domain, Google Cloud DNS, AWS Route53.
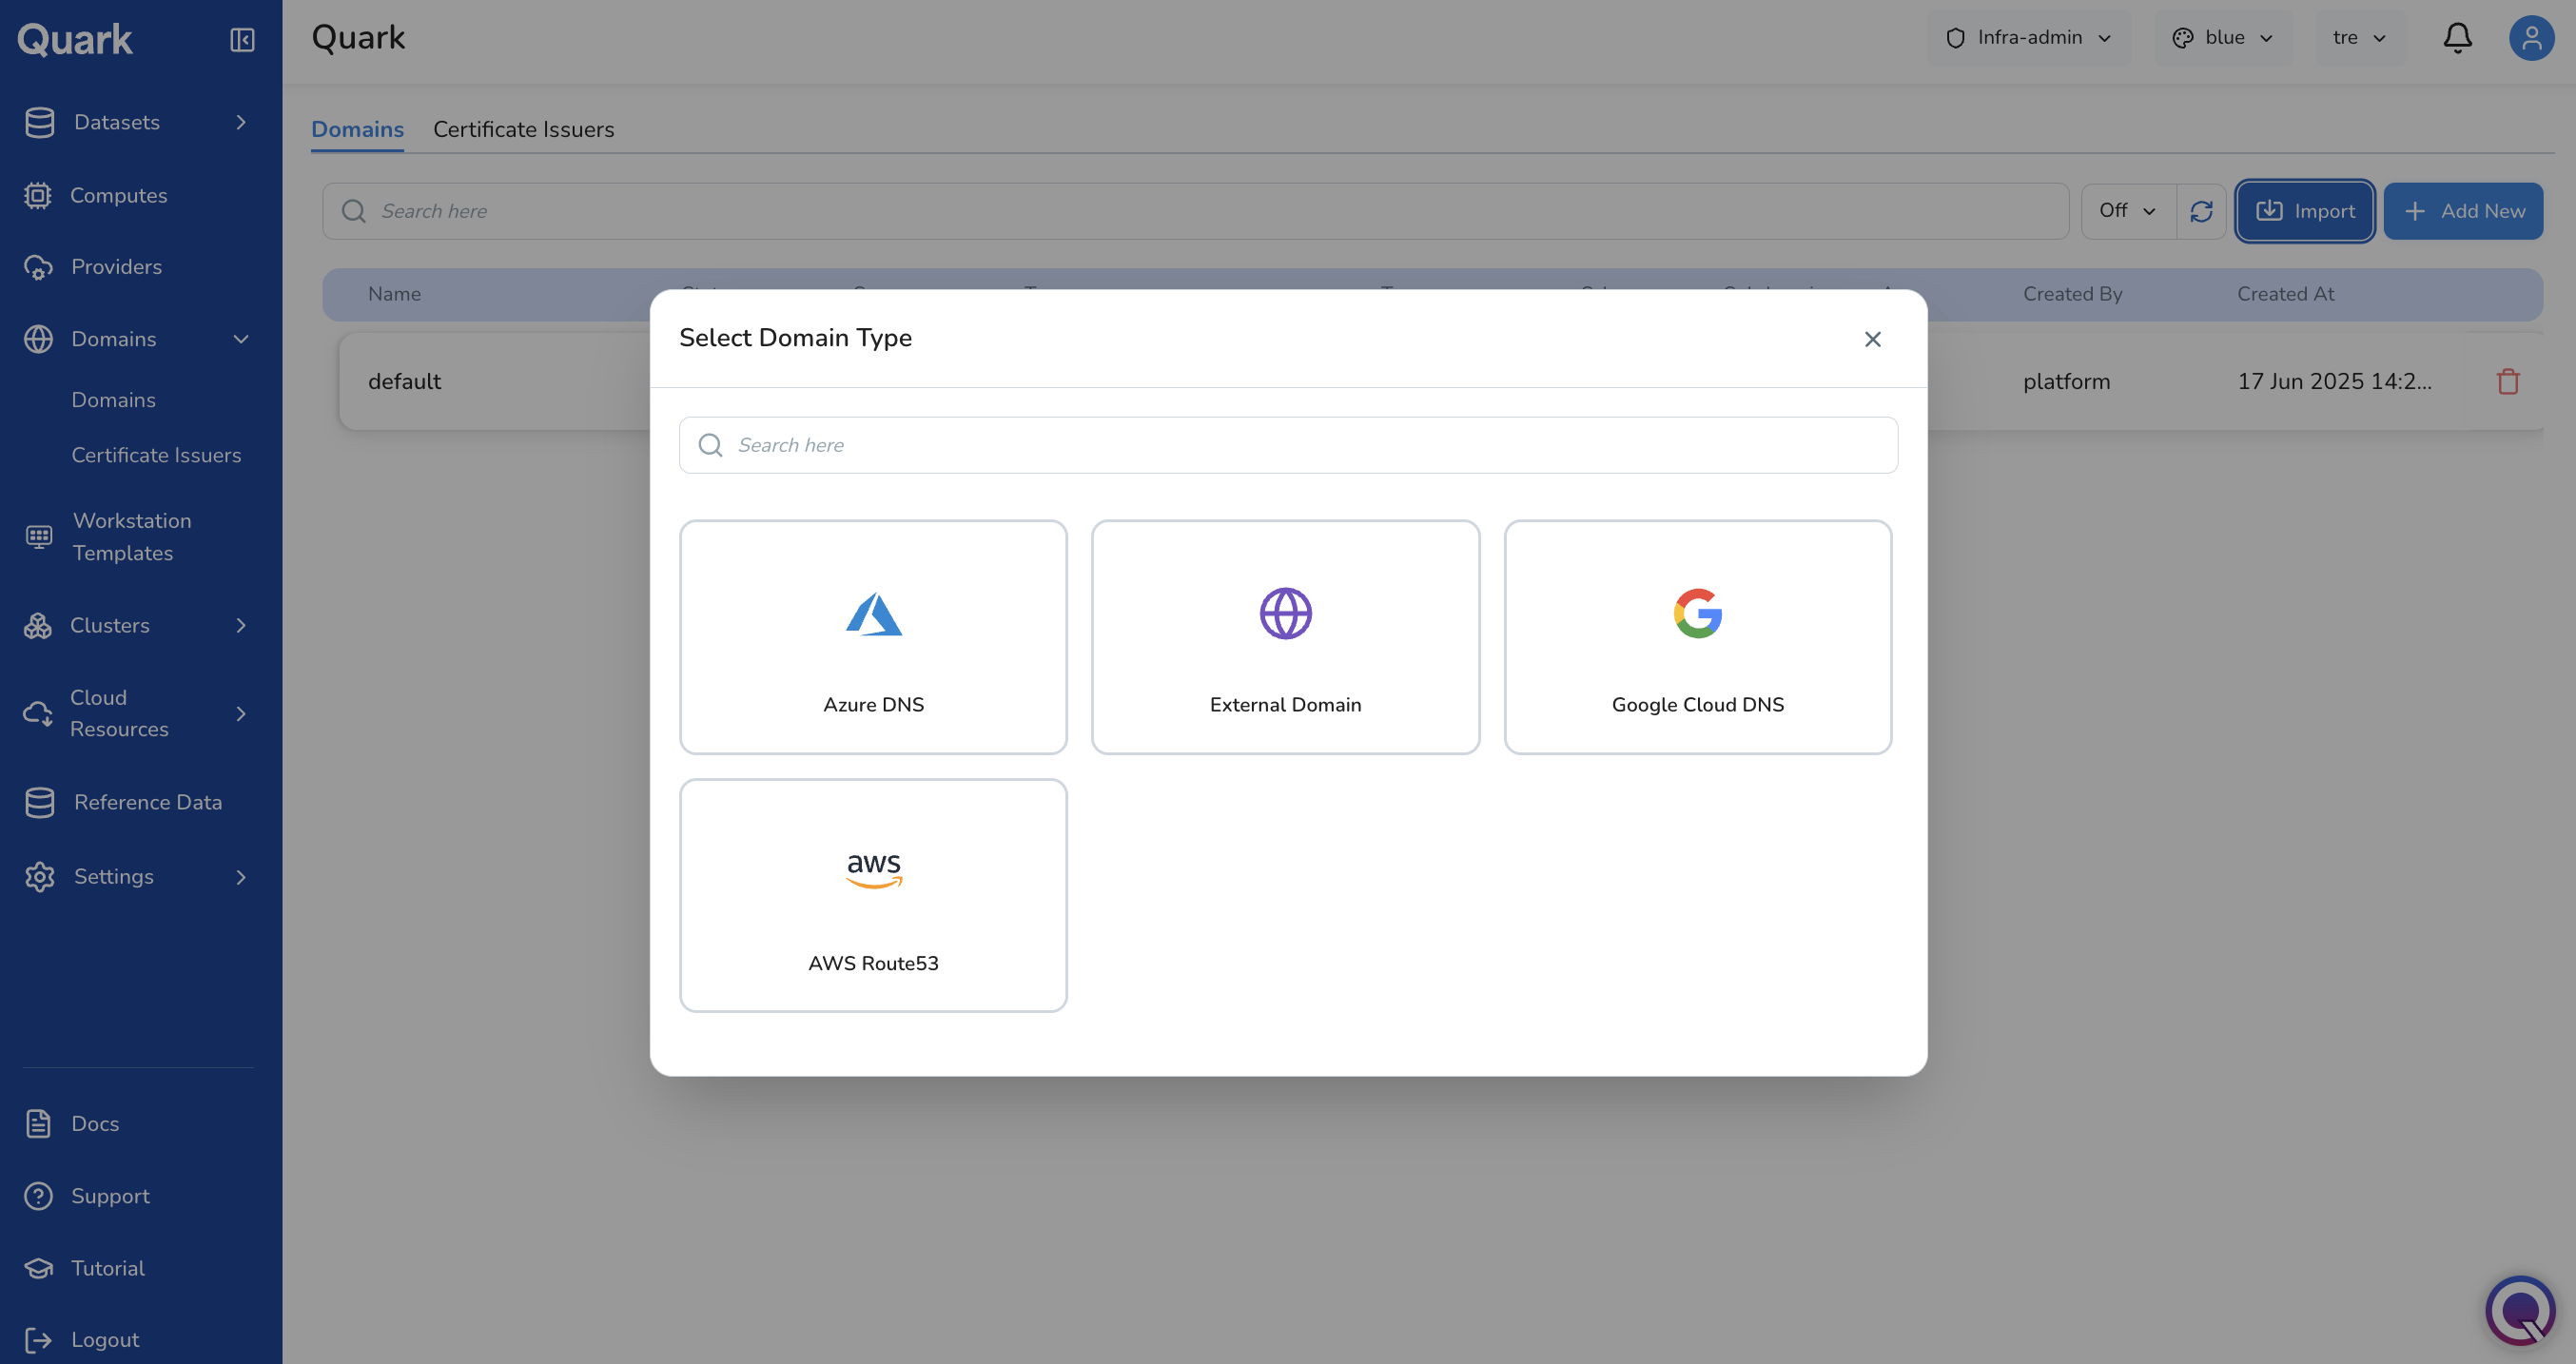
-
Select the appropriate domain type. The wizard opens for that type.
The example below walks through importing a Google Cloud DNS domain.
Step 1: General

| Field | Description |
|---|---|
| Name (mandatory) | A unique identifier for this domain entry. Maximum 32 characters. Must start with a letter and contain only lowercase alphanumeric characters and hyphens. Not editable after creation. |
| Description | An optional description of this domain's purpose or scope. Maximum 255 characters. |
Step 2: Spec
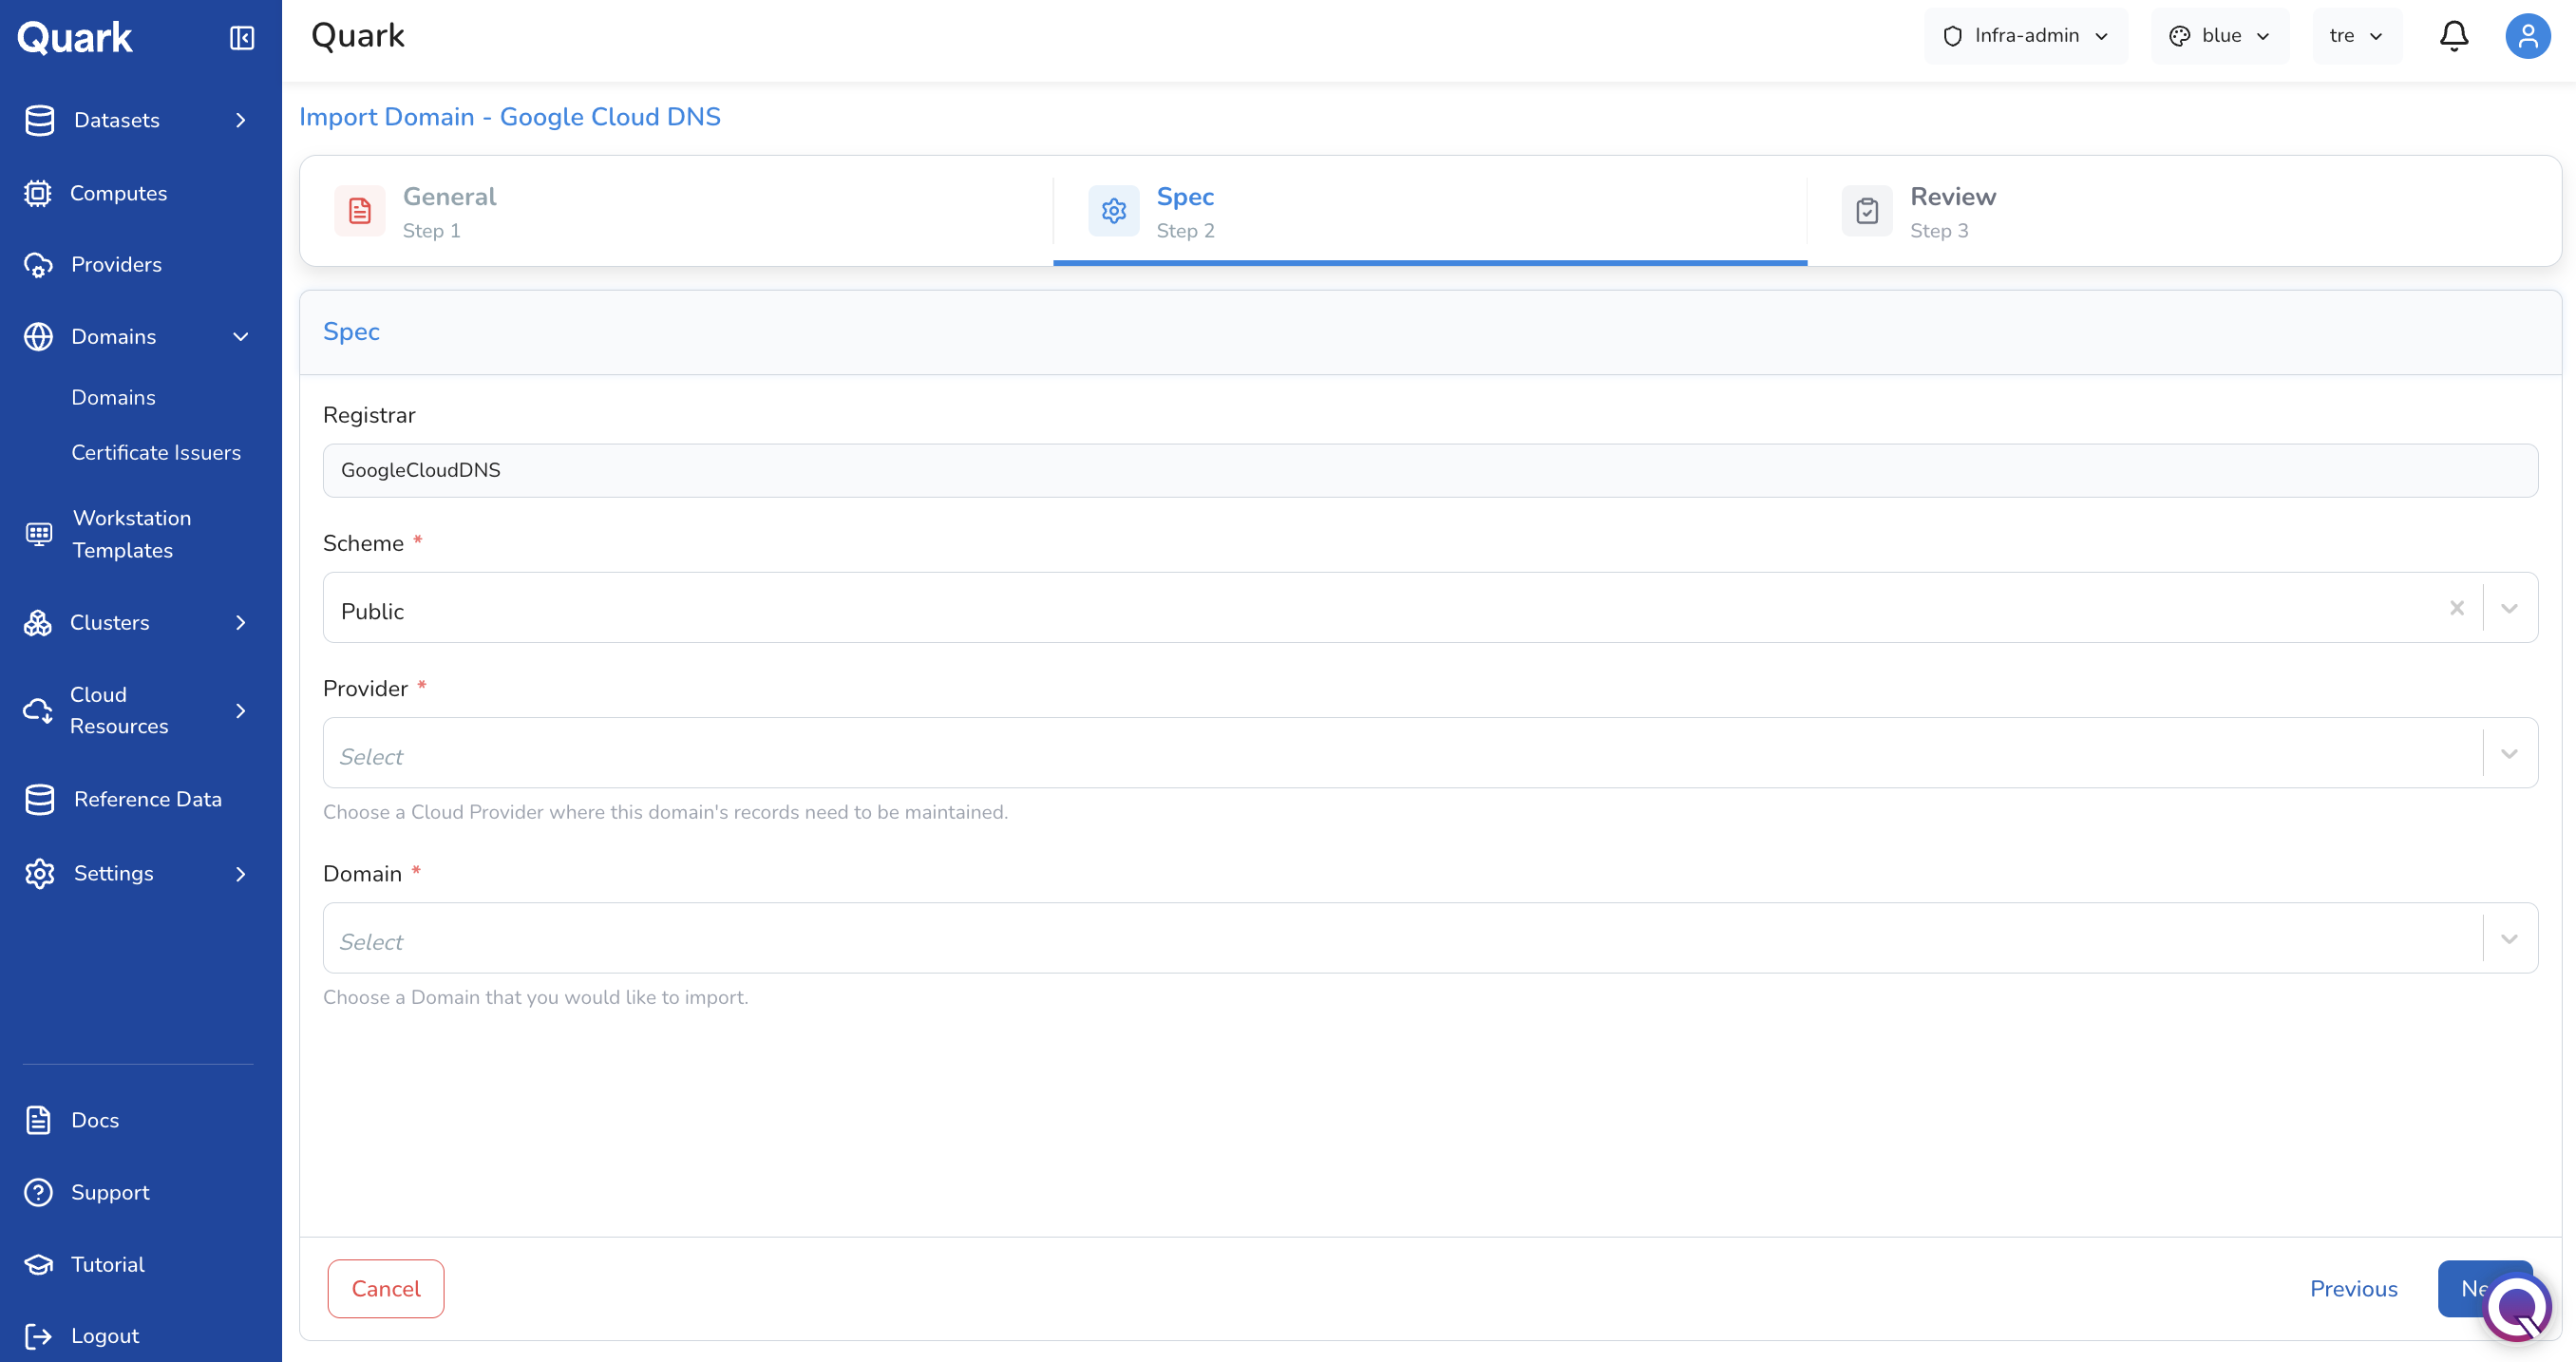
| Field | Description |
|---|---|
| Registrar | Auto-populated based on the domain type selected (e.g., GoogleCloudDNS). Read-only. |
| Scheme (mandatory) | Whether the domain is Public (internet-facing) or Private (accessible only within internal networks). |
| Provider (mandatory) | The connected cloud provider account where this domain's DNS records are maintained. Select from the providers registered in Providers. |
| Domain (mandatory) | The specific DNS zone to import from the selected cloud provider. The dropdown is populated once a Provider is selected. |
Step 3: Review
Review all configuration details, then click Create to register the imported domain.
Creating a New Domain
- Click + Add New in the toolbar.
-
The Select Domain Type modal appears. Available types for new creation: Azure DNS, Google Cloud DNS, AWS Route53 (Private), AWS Route53.
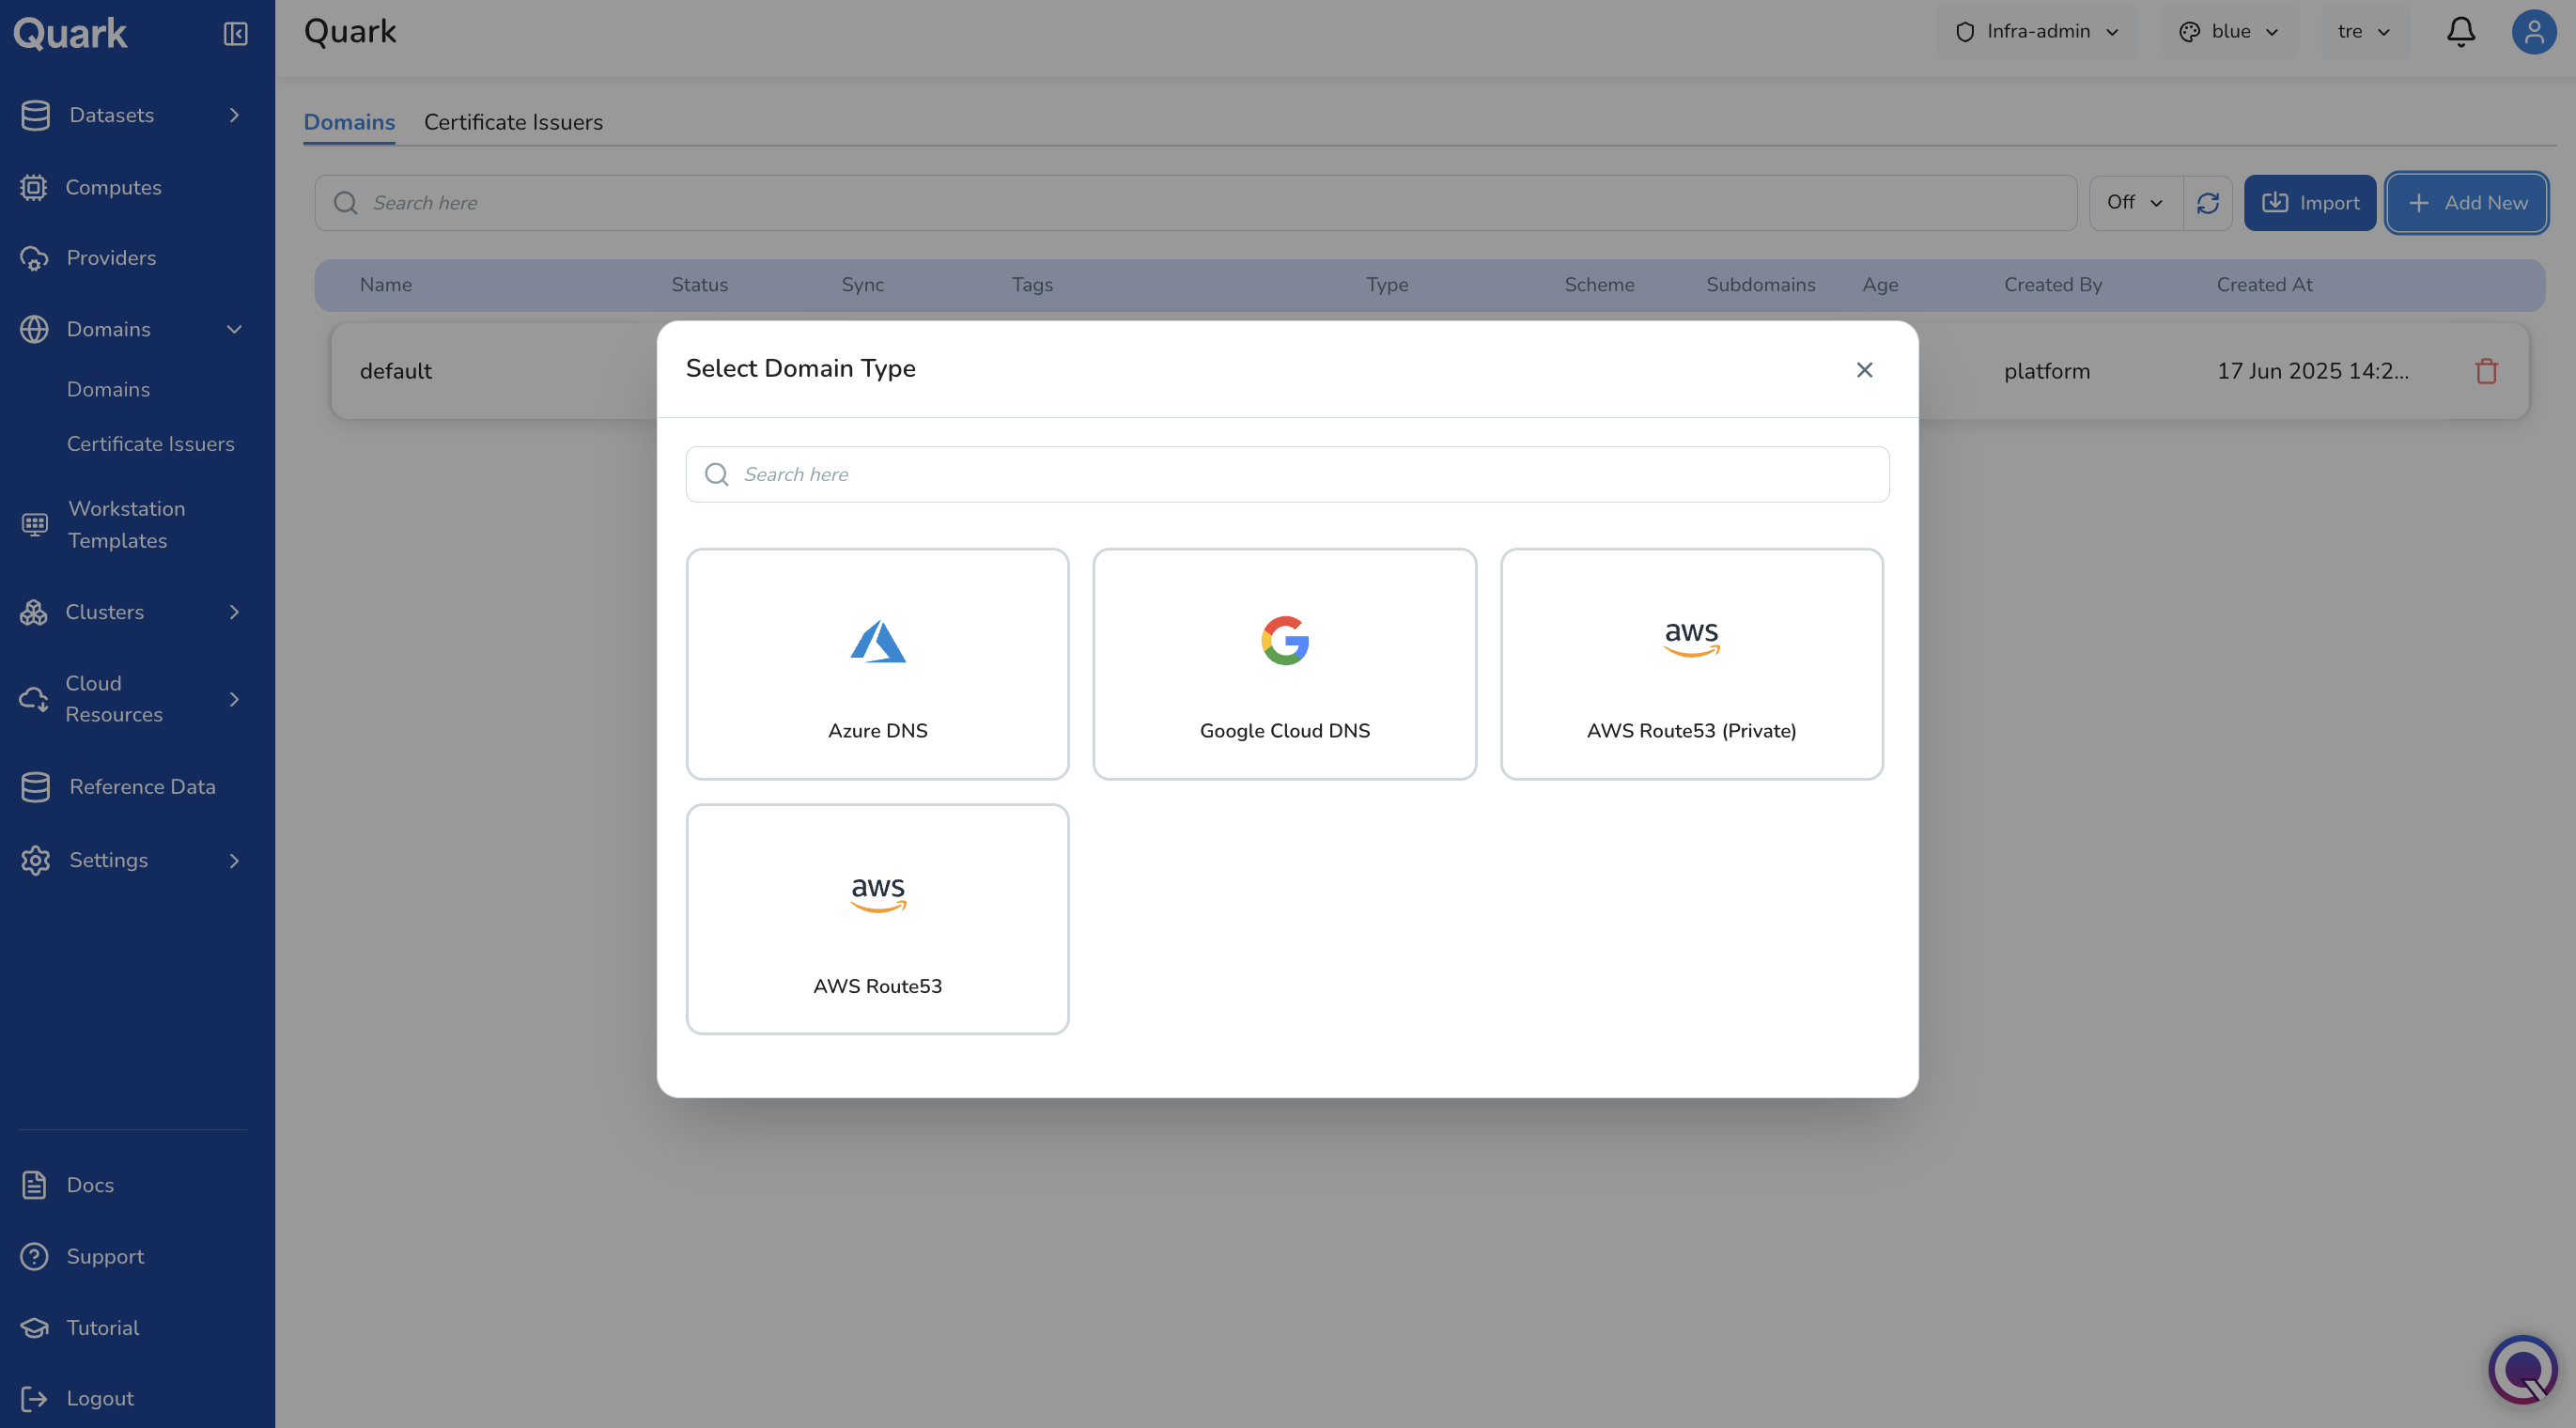
-
Select the appropriate domain type. The wizard opens for that type.
The example below walks through creating an AWS Route53 (Private) domain.
Step 1: General
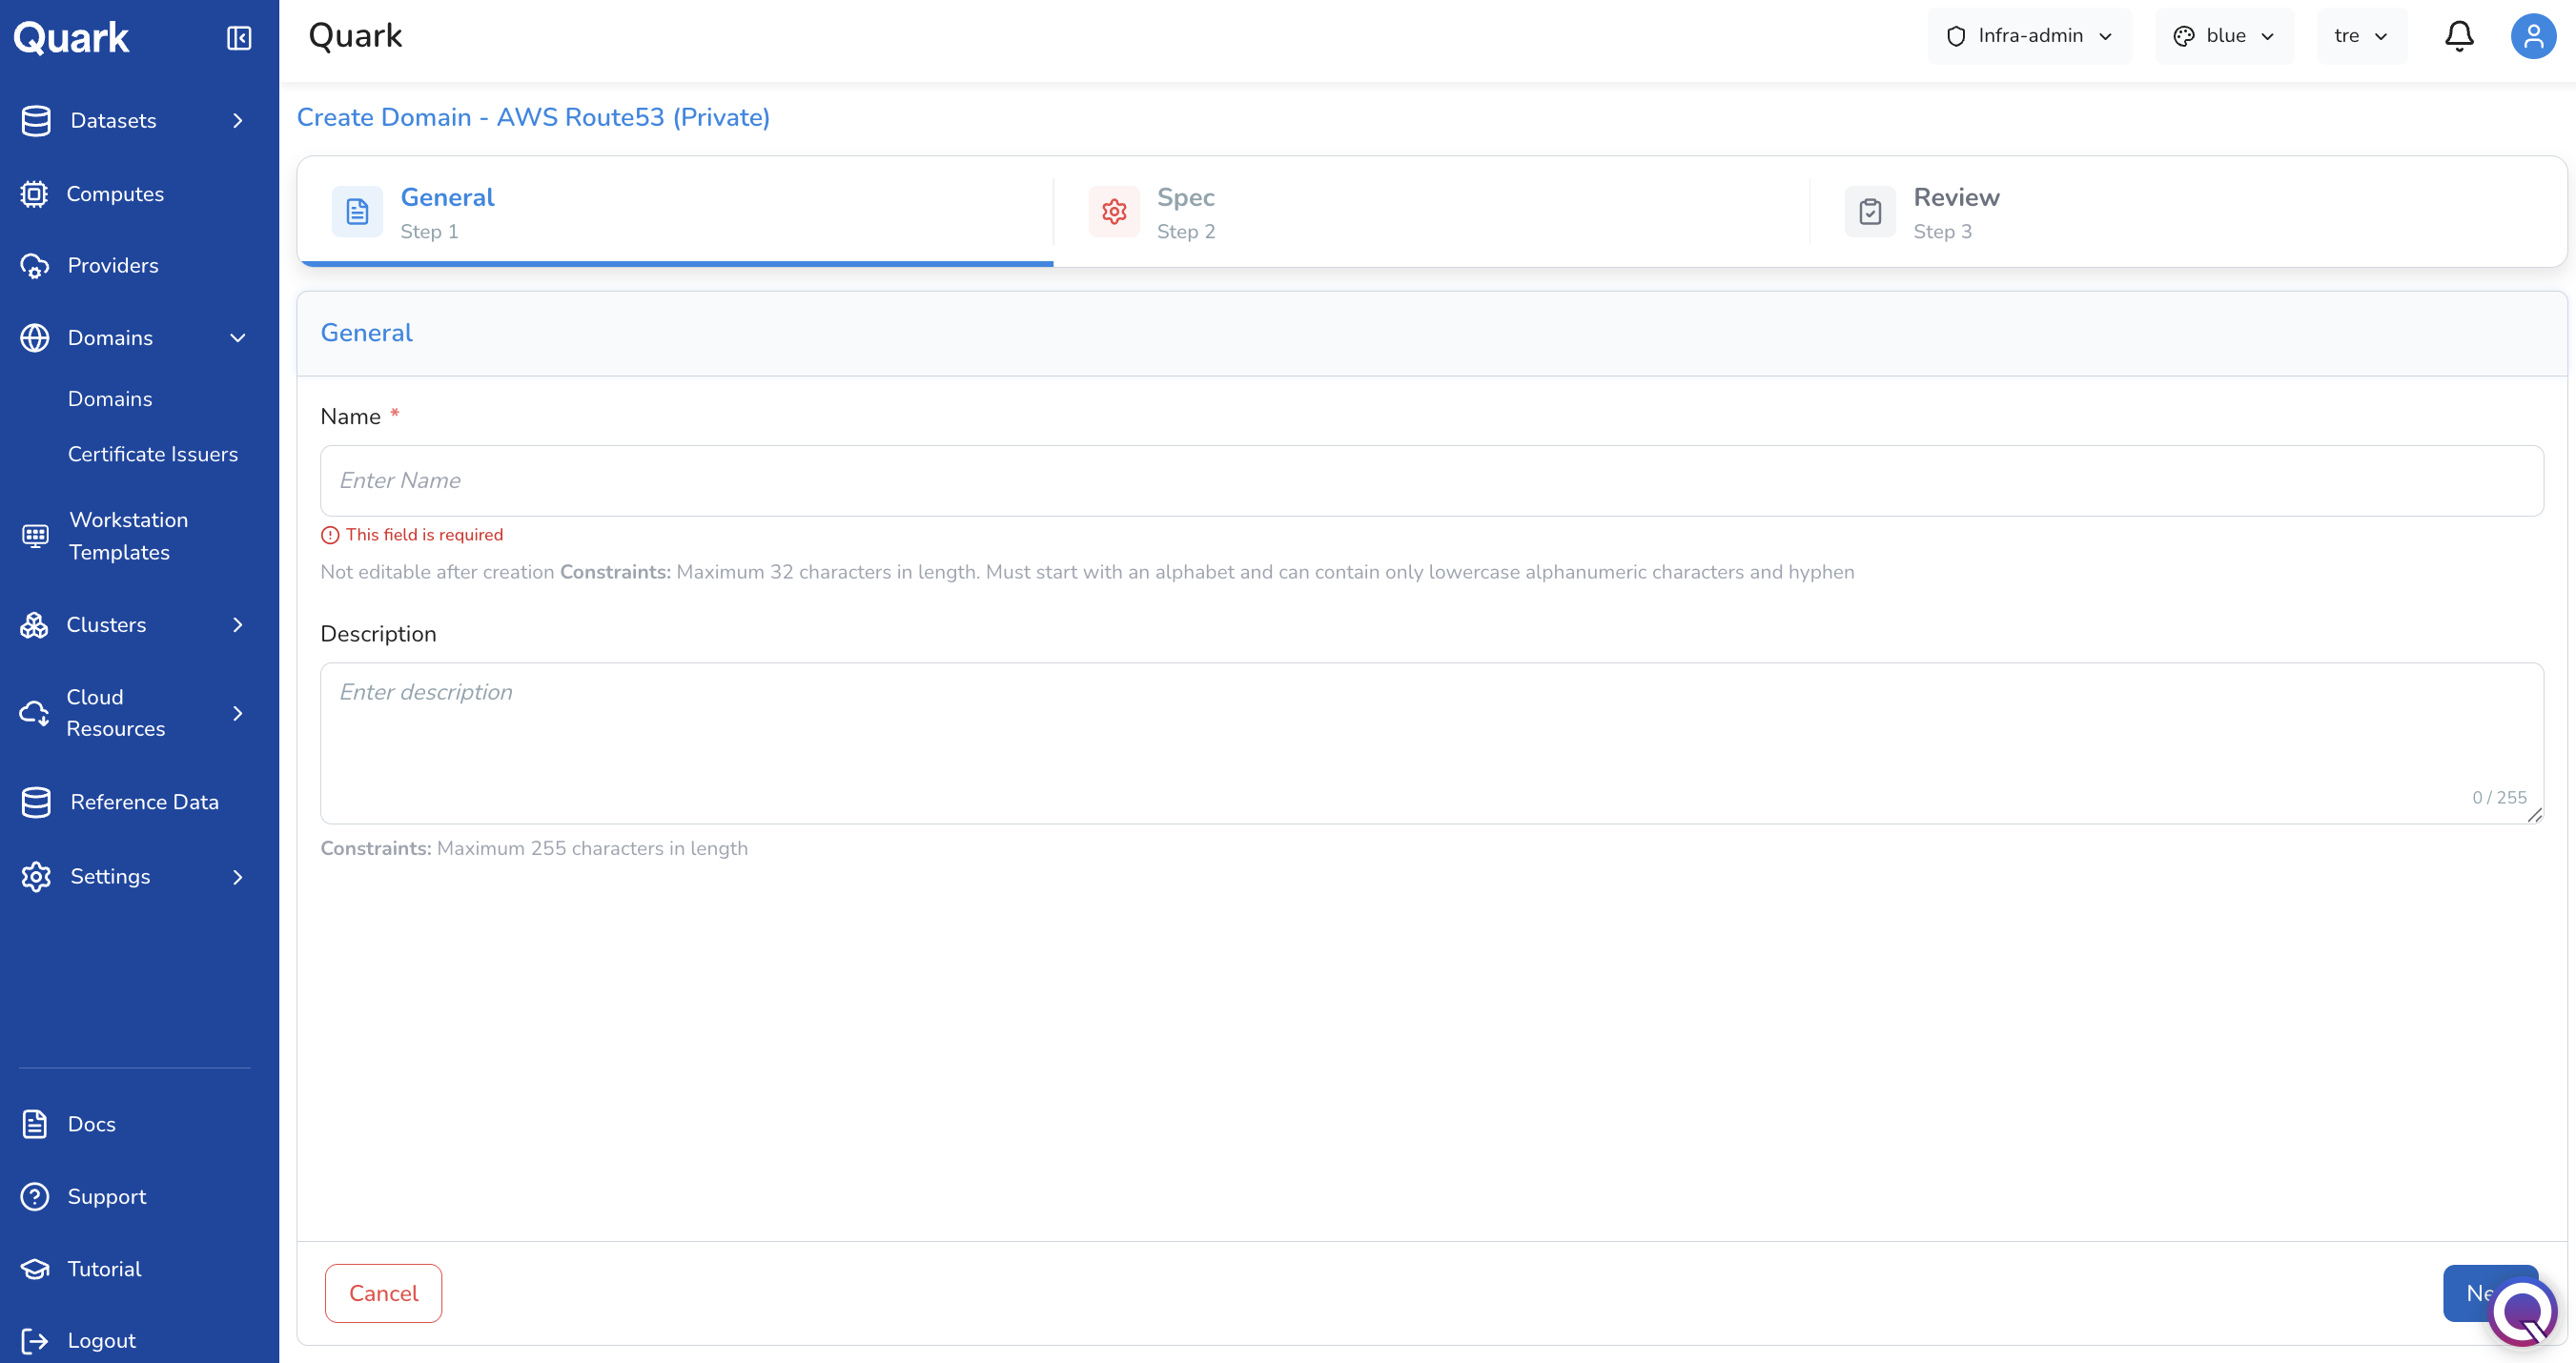
| Field | Description |
|---|---|
| Name (mandatory) | A unique identifier for this domain entry. Maximum 32 characters. Must start with a letter and contain only lowercase alphanumeric characters and hyphens. Not editable after creation. |
| Description | An optional description. Maximum 255 characters. |
Step 2: Spec
The Spec step for a newly created domain includes a Type field that determines what additional fields appear.
If Type = Root Domain:
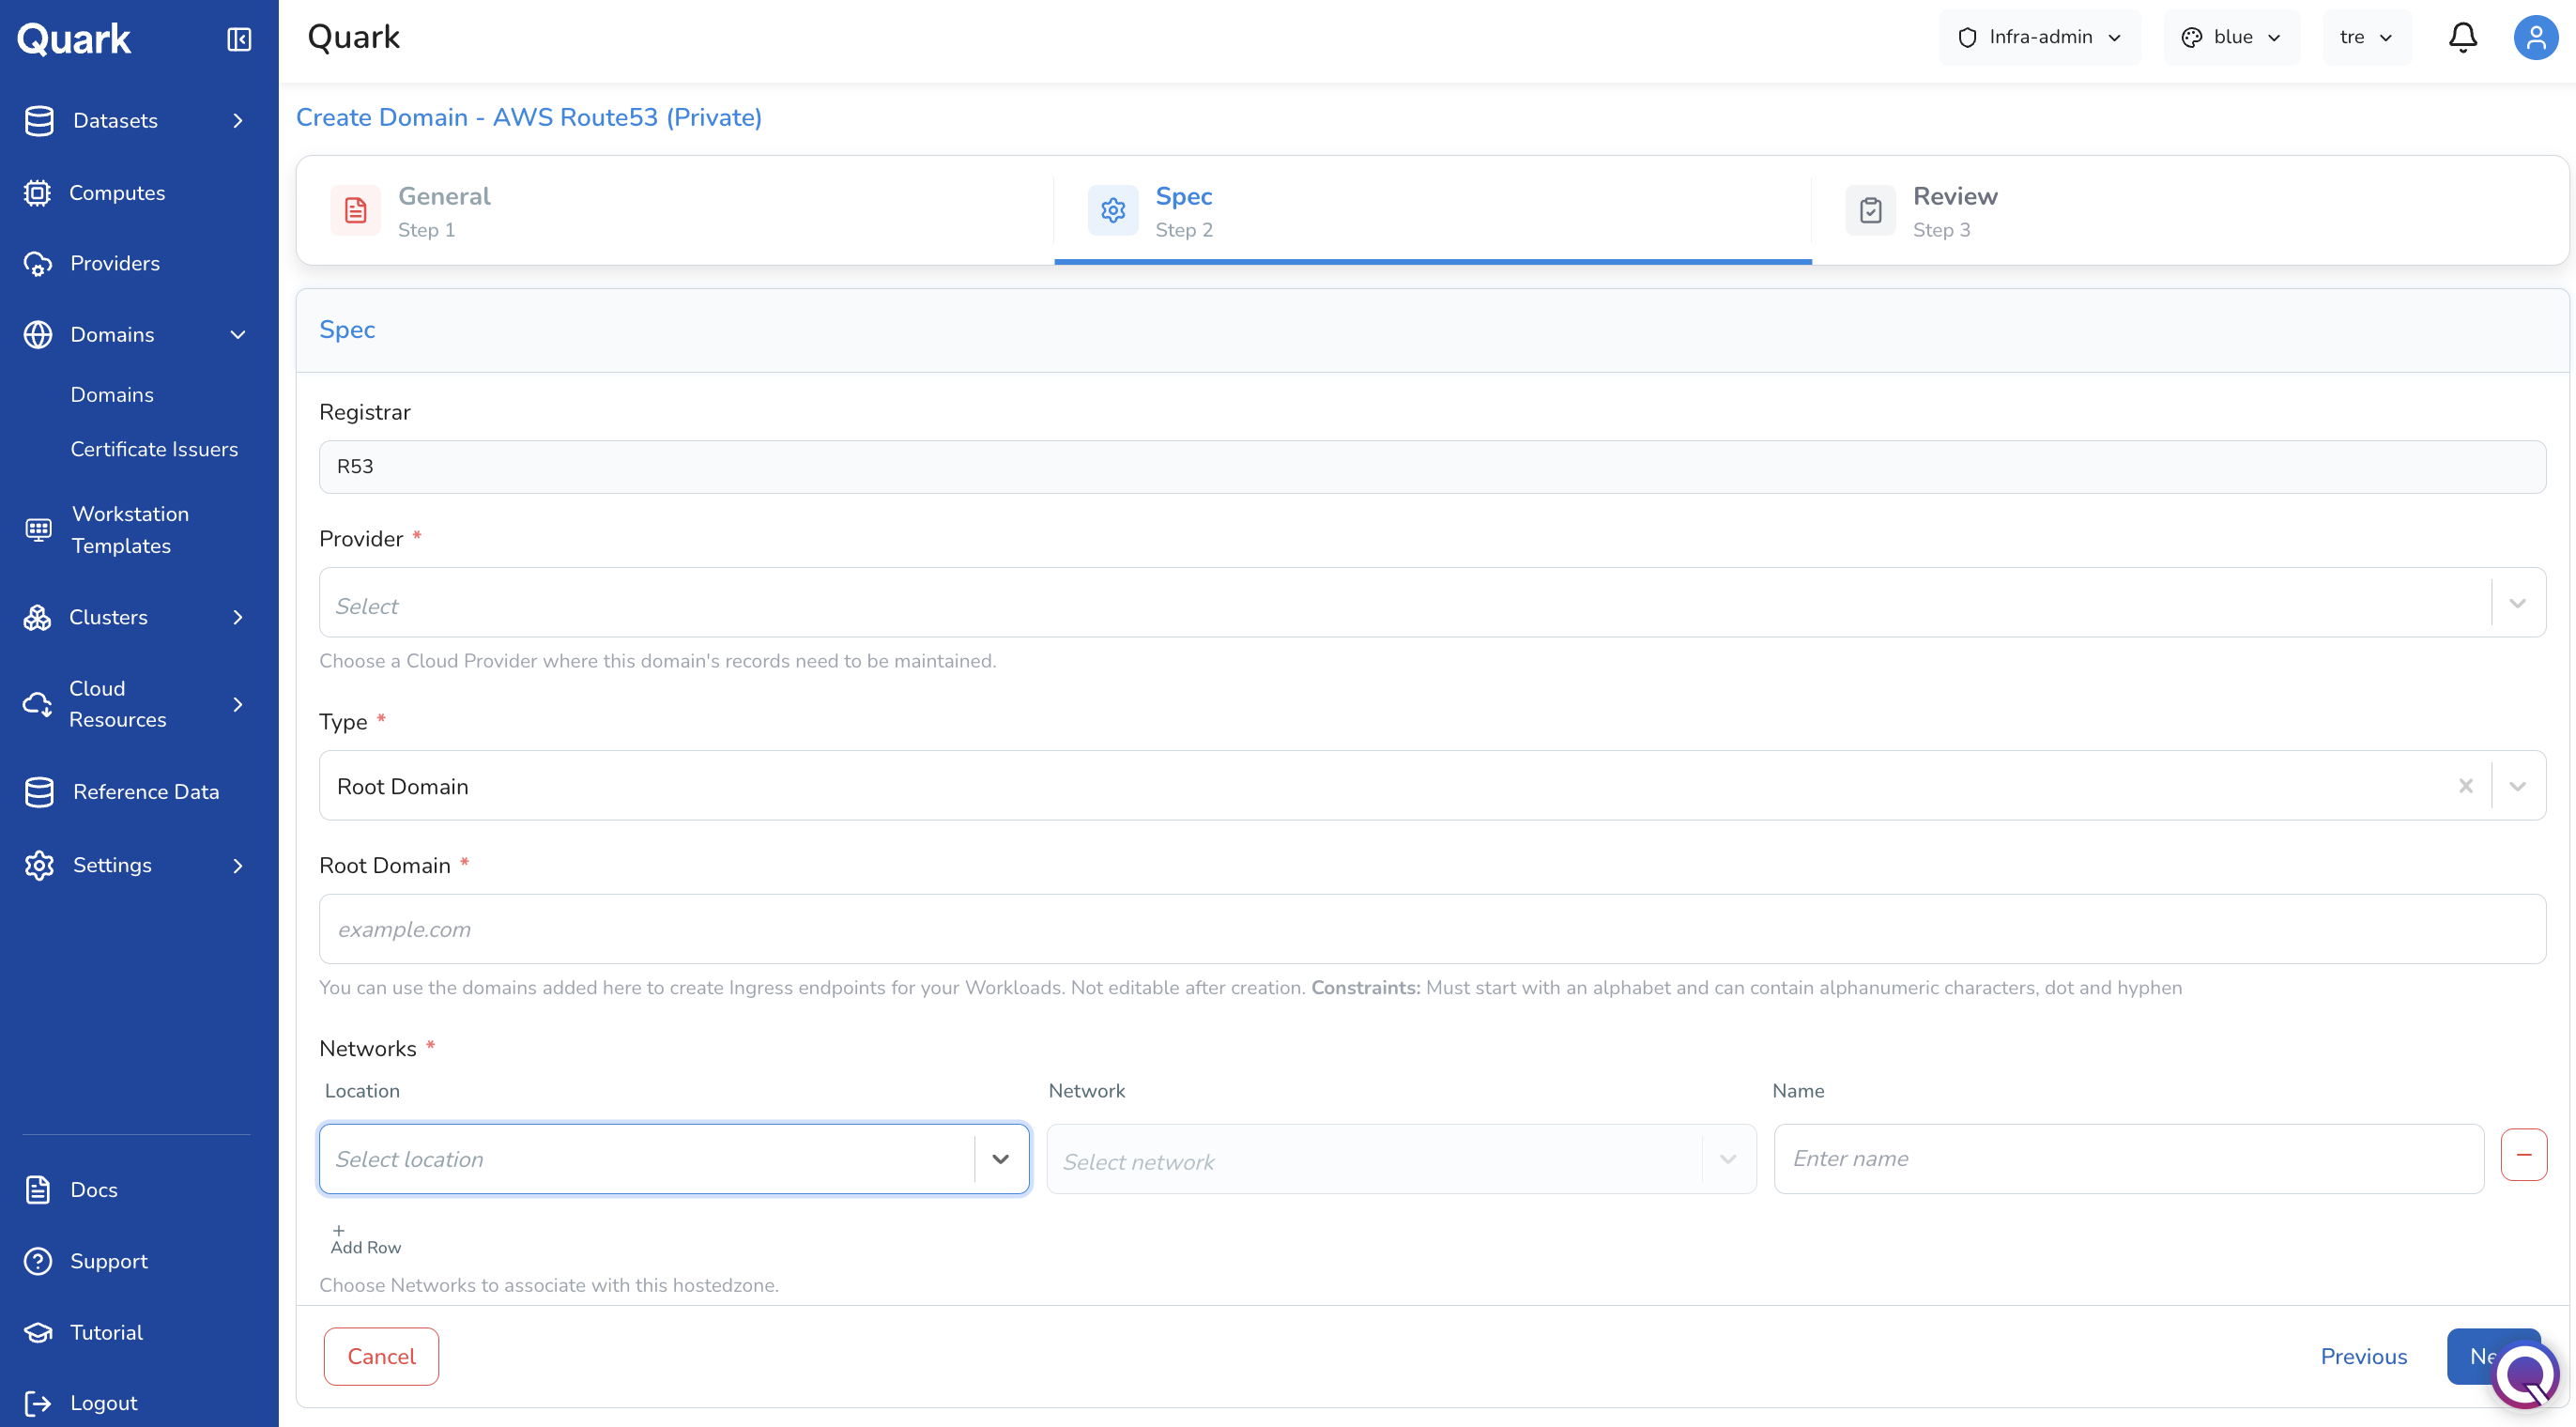
| Field | Description |
|---|---|
| Registrar | Auto-populated based on domain type (e.g., R53). Read-only. |
| Provider (mandatory) | The connected AWS provider account where this hosted zone will be created. |
| Type (mandatory) | Set to Root Domain. Defines this as the top-level zone (e.g., example.com). |
| Root Domain (mandatory) | The root domain name to register (e.g., example.com). Not editable after creation. Must start with a letter and contain only alphanumeric characters, dots, and hyphens. |
| Networks (mandatory) | One or more networks (VPCs) to associate with this private hosted zone. Click + Add Row to add a network association. Each row requires a Location (region), a Network (VPC), and a Name for the association. |
If Type = Sub:
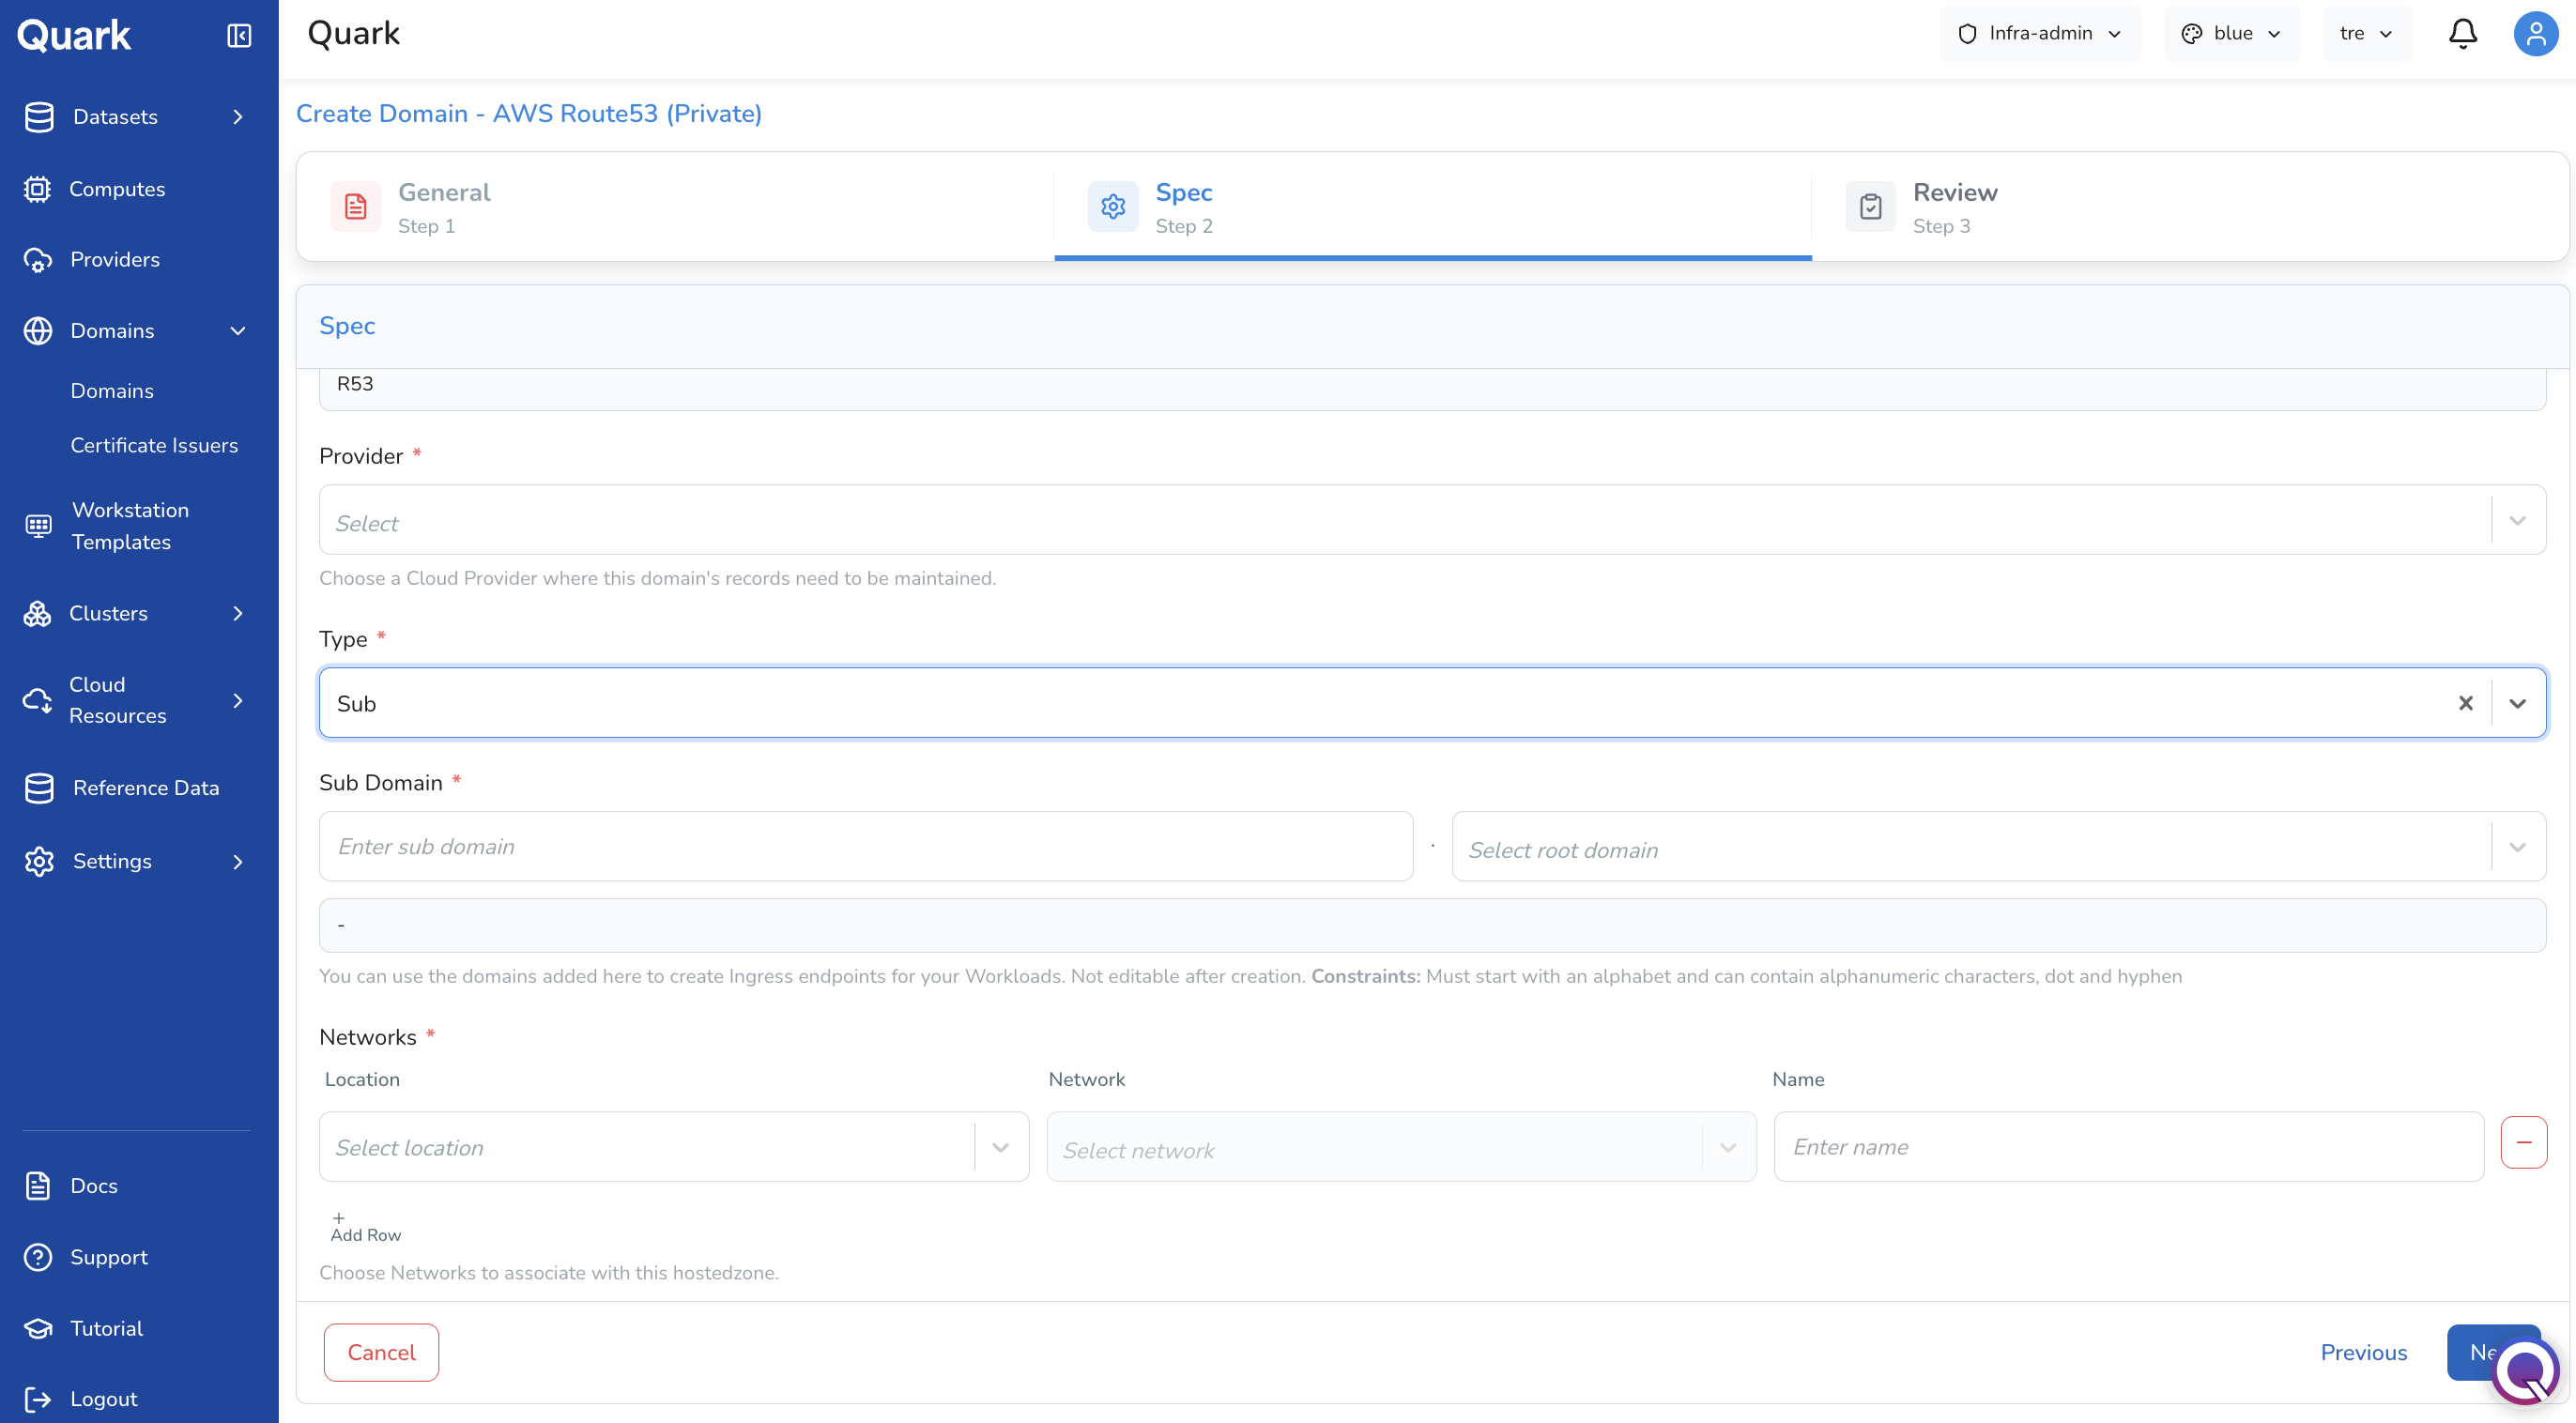
| Field | Description |
|---|---|
| Registrar | Auto-populated. Read-only. |
| Provider (mandatory) | The connected AWS provider account where this hosted zone will be created. |
| Type (mandatory) | Set to Sub. Defines this as a subdomain beneath an existing root domain. |
| Sub Domain (mandatory) | Enter the subdomain prefix in the left field and select the root domain from the dropdown on the right. The full domain name is previewed below the fields (e.g., api.example.com). Not editable after creation. |
| Networks (mandatory) | One or more VPC associations for this hosted zone. Click + Add Row to configure each association with Location, Network, and Name. |
Step 3: Review
Review all configuration details, then click Create to provision the new hosted zone.
Managing Domains
Each row in the Domains list has a Delete action (red trash icon). Deleting a domain removes the platform's registration of it — the underlying DNS zone in the cloud provider is not affected.
Note: Domain configuration (name, subdomain, and network associations) is not editable after creation. If a domain needs to be reconfigured, delete the entry and recreate it with the correct settings.
Certificate Issuers Tab
The Certificate Issuers Page
The Certificate Issuers tab lists all certificate authorities configured on the platform. Each row shows the issuer name, its Status, Sync state, the Cluster it is associated with, its Age, and creation metadata.
Certificate issuers are reusable across all domains registered on the platform. Once an issuer is configured, it can be referenced by any domain to handle TLS certificate provisioning automatically.
Adding a Certificate Issuer
- Navigate to the Certificate Issuers tab.
- Click + Add New.
-
The Select Certificate Issuer Type modal appears.
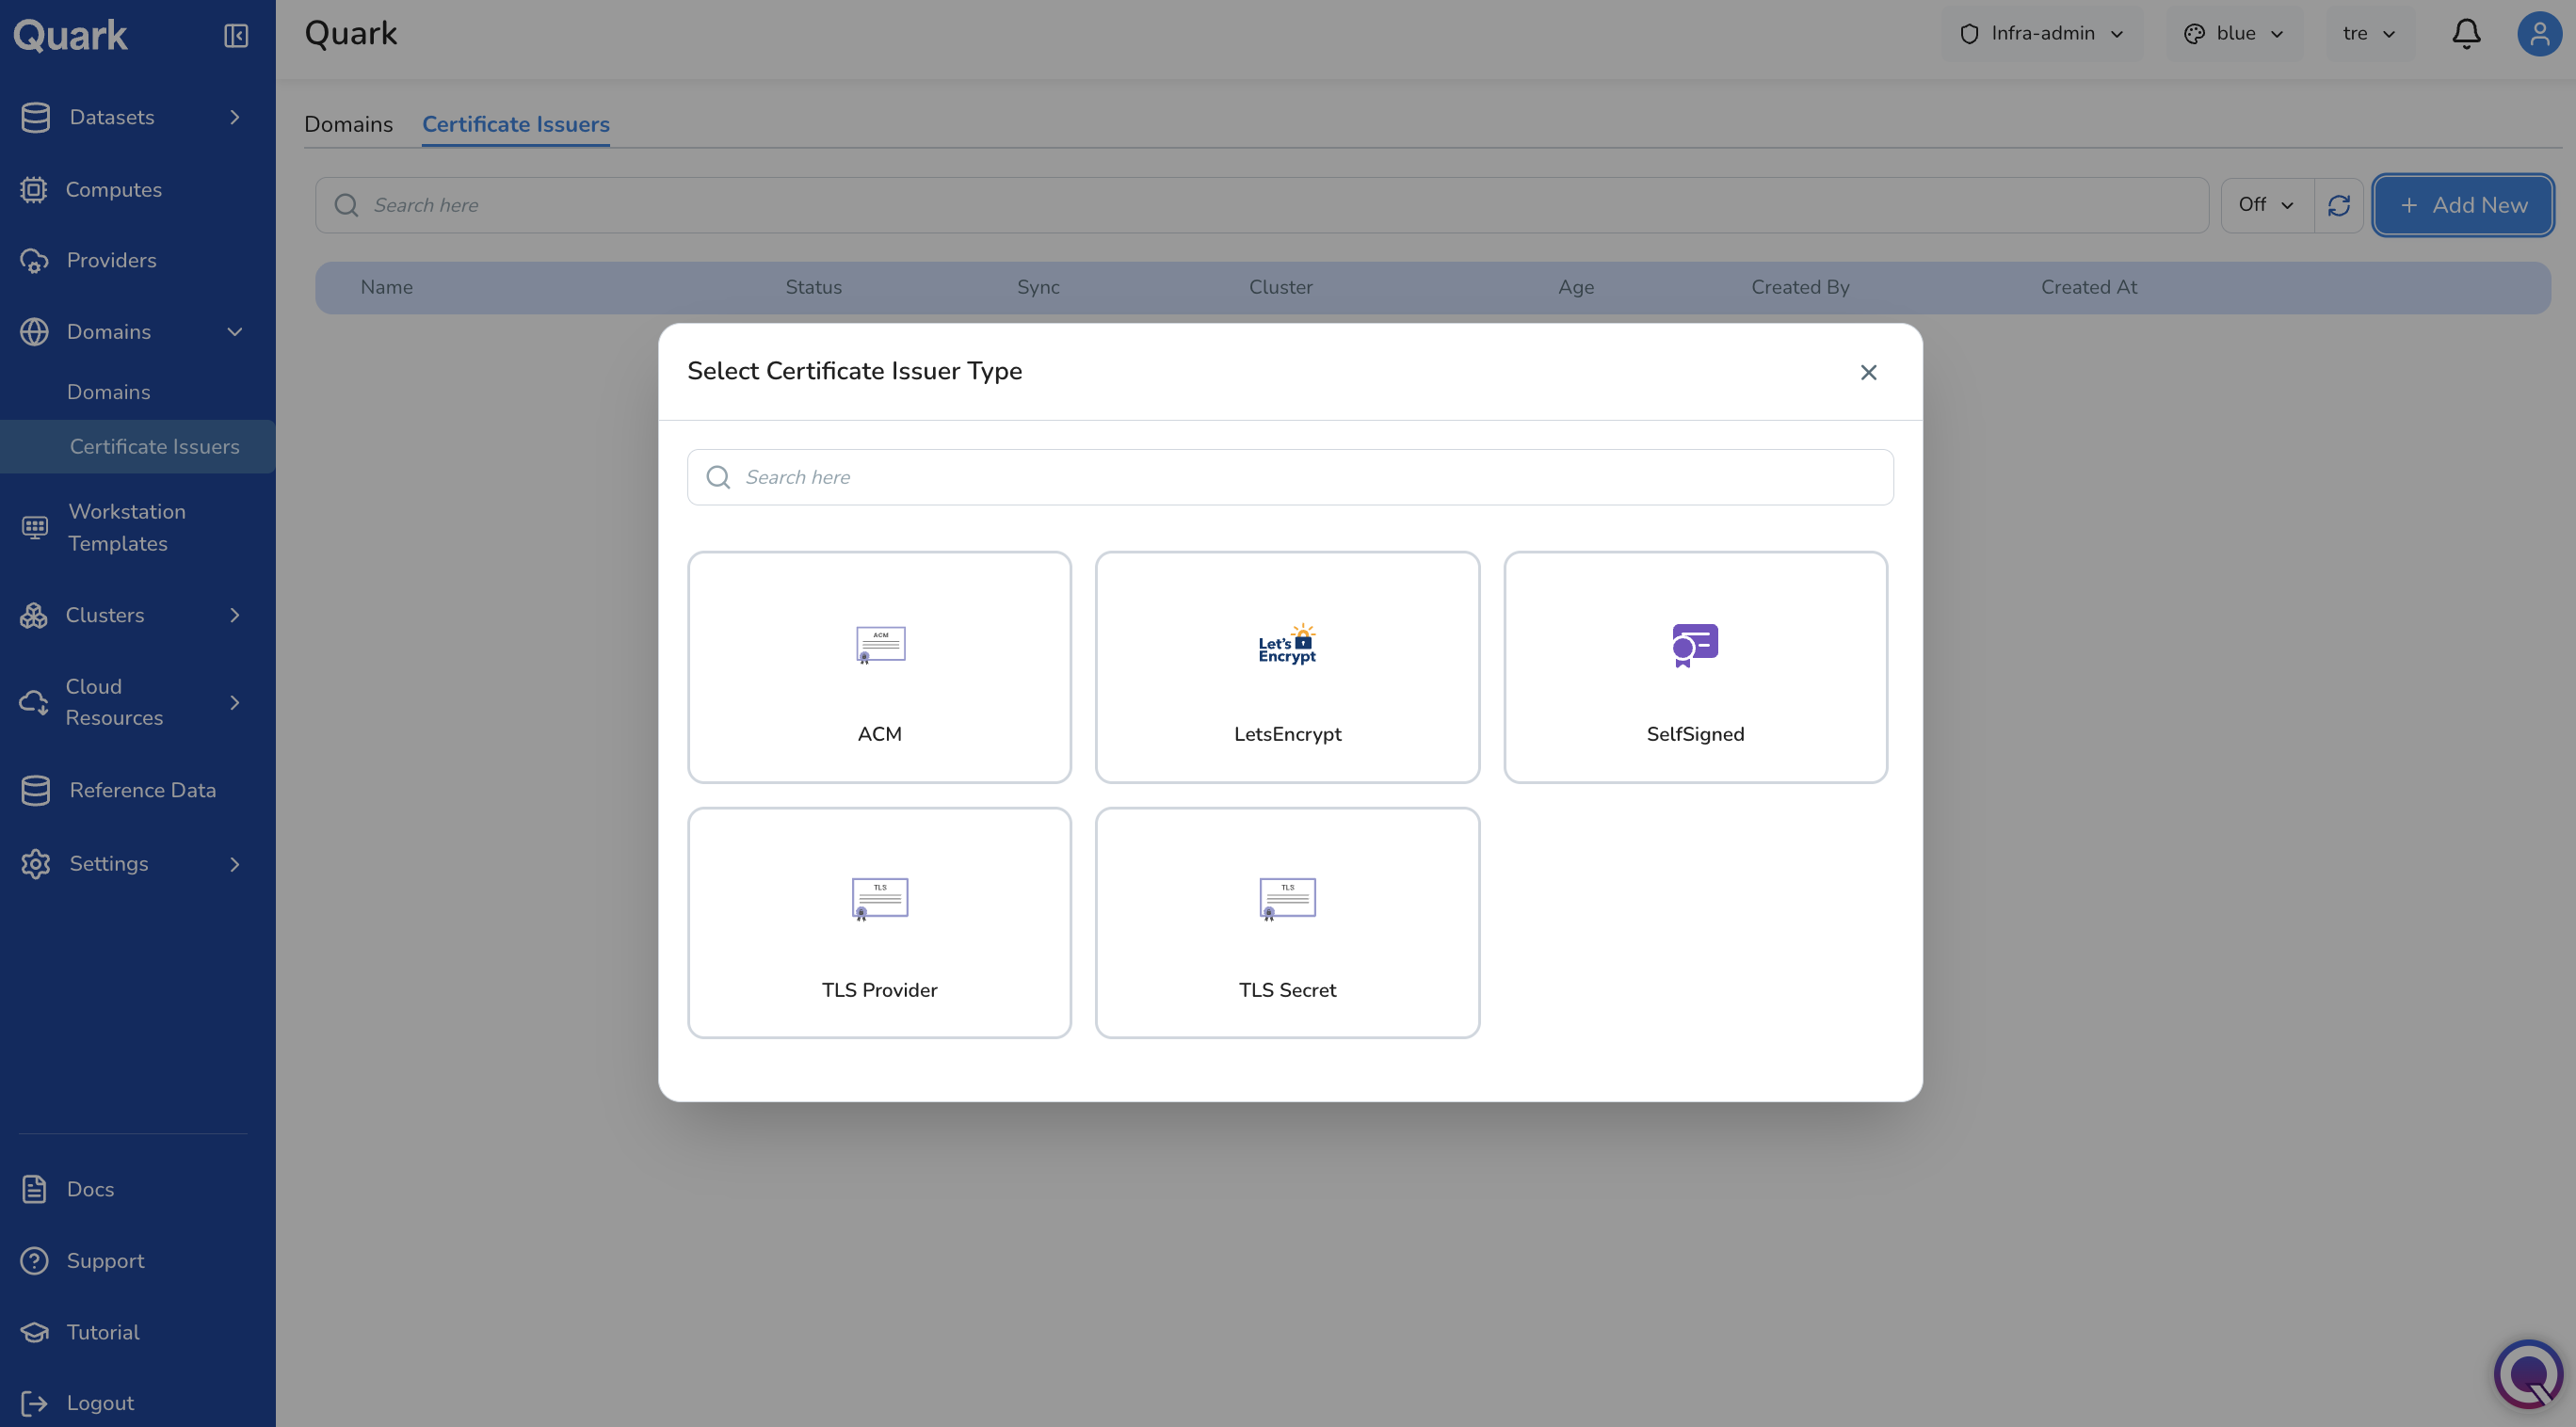
Available issuer types:
Type Description ACM AWS Certificate Manager. Provisions and renews certificates automatically through AWS. Best suited for workloads running entirely on AWS infrastructure. LetsEncrypt Free, automated TLS certificates via the ACME protocol. Suitable for public-facing domains that can respond to HTTP or DNS challenges. SelfSigned Generates self-signed certificates. Useful for internal or development environments where a trusted CA is not required. TLS Provider Uses a TLS Certificate Provider credential registered in Providers to provision certificates through an external or private CA. TLS Secret References an existing Kubernetes secret containing a certificate and private key. Use when certificates are managed externally and manually rotated into the cluster. -
Select the issuer type. A three-step wizard opens: General → Spec → Review.
Step 1 — General is the same for all issuer types: provide a Name and optional Description using the same constraints as other platform resources (max 32 characters, lowercase alphanumeric and hyphens, not editable after creation).
Step 2 — Spec varies by issuer type. For ACM, the Spec step requires selecting the connected AWS Provider account that will be used to issue certificates. Other issuer types require fields appropriate to their certificate provisioning mechanism — for example, an email address and challenge solver configuration for LetsEncrypt, or a cluster and secret reference for TLS Secret.
Step 3 — Review: confirm all configuration details, then click Create to register the issuer. Once created, the issuer becomes available to reference when configuring TLS for platform domains and services.
What's Next
- Providers — Cloud provider accounts and TLS Certificate Provider credentials referenced in domain and issuer configurations must be registered in Providers before they can be selected here.
- Clusters — Certificate issuers are associated with specific clusters. Ensure the target cluster is provisioned and healthy before configuring an issuer against it.
- Workstation Templates — Workstation environments exposed through ingress routes depend on the domains and certificates configured here.